Configuration Guide — Every Tab Explained
The desktop app OneSigner Configuration (OneSignerConfig.exe) manages every aspect of the signing service. All settings are written to C:\OneSigner\app\appsettings.json; the service reads them at startup, so after saving changes press Restart in Service Control (General tab). This page walks through activating your trial and configuring every tab — with real screenshots of the whole flow.
1. Get Your Trial Key from the Portal
A fresh install runs unlicensed (PDF/code signing work in trial-prompt mode, and Portal / Multi-tenant / Custom Folders are off). Activate the free 30-day trial first — it unlocks every feature, including Cloudflare Tunnel, with no credit card.
- Create an account / sign in at onesign.sg. Your dashboard shows a Get Trial Key button:

- Open Trial and click Generate Trial Key:

- Your key appears immediately (it is also emailed to you). Click Copy:

2. Activate the Key — License Tab
- In OneSigner Configuration open the License tab, paste the key into the License Key box and click Save License Settings.
- Press Restart on the General tab (the service loads the license at startup), then Refresh here.
The status turns green — License valid — and every capability flips to ON:
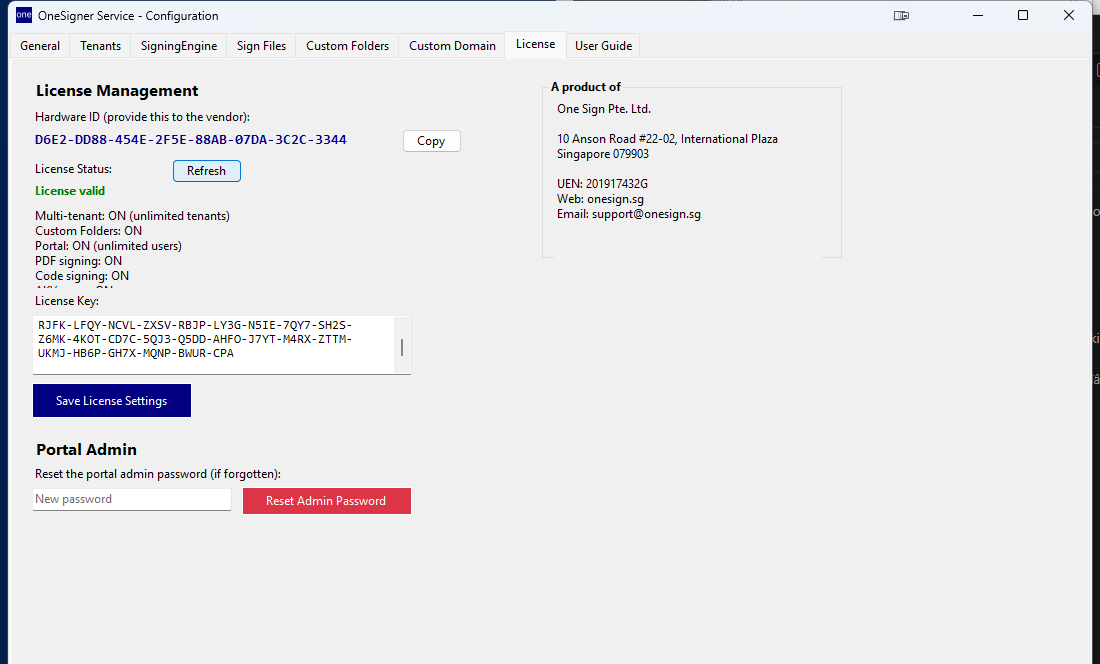
Also on this tab: the Hardware ID (needed when buying a machine-bound license) and Portal Admin — reset the web portal's admin password here if you ever lose it. Trouble? See License Activation.
3. General Tab
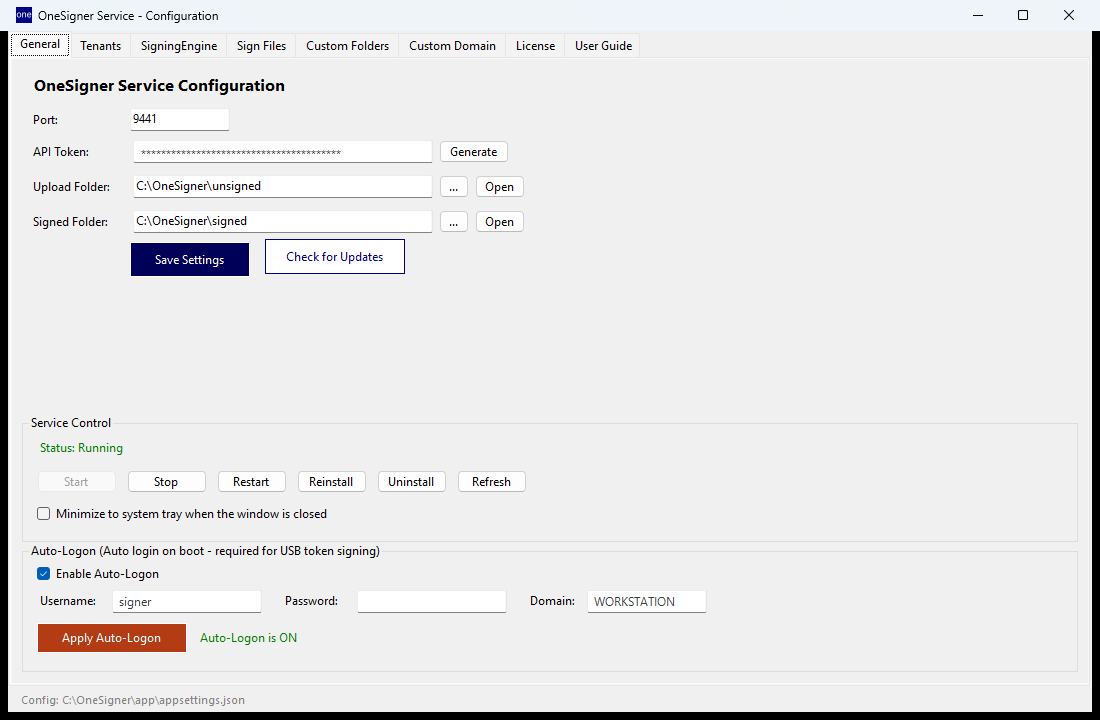
- Port — REST API and web portal port (default
9440). - API Token — Bearer token for API clients; Generate creates a strong one. Keep it secret.
- Upload / Signed Folder — default folders for the upload API and folder watch.
- Service Control — Start / Stop / Restart / Reinstall / Uninstall the Windows service without leaving the app.
- Auto-Logon — keeps an interactive desktop session alive after reboot so the USB token stays reachable; required for unattended signing. Details: Signing Fails in Service Mode.
4. Tenants Tab (Multi-tenant)
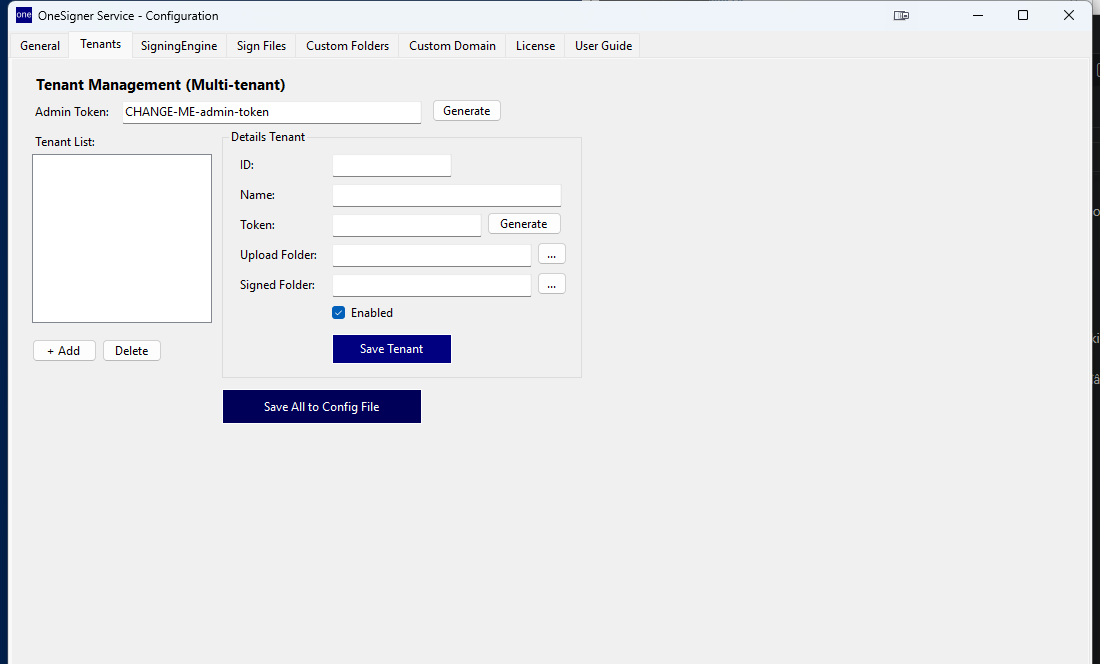
- Admin Token — the master token for management APIs. It ships as
CHANGE-ME-admin-token— click Generate and save before going to production. - + Add a tenant: give it an ID, Name, its own Token (Generate), and separate Upload / Signed folders. Each customer or department gets an isolated token and folder pair.
- Click Save Tenant, then Save All to Config File, then restart the service.
Full bureau walkthrough: Multi-Tenant Bureau Setup.
5. SigningEngine Tab — Signing Profiles
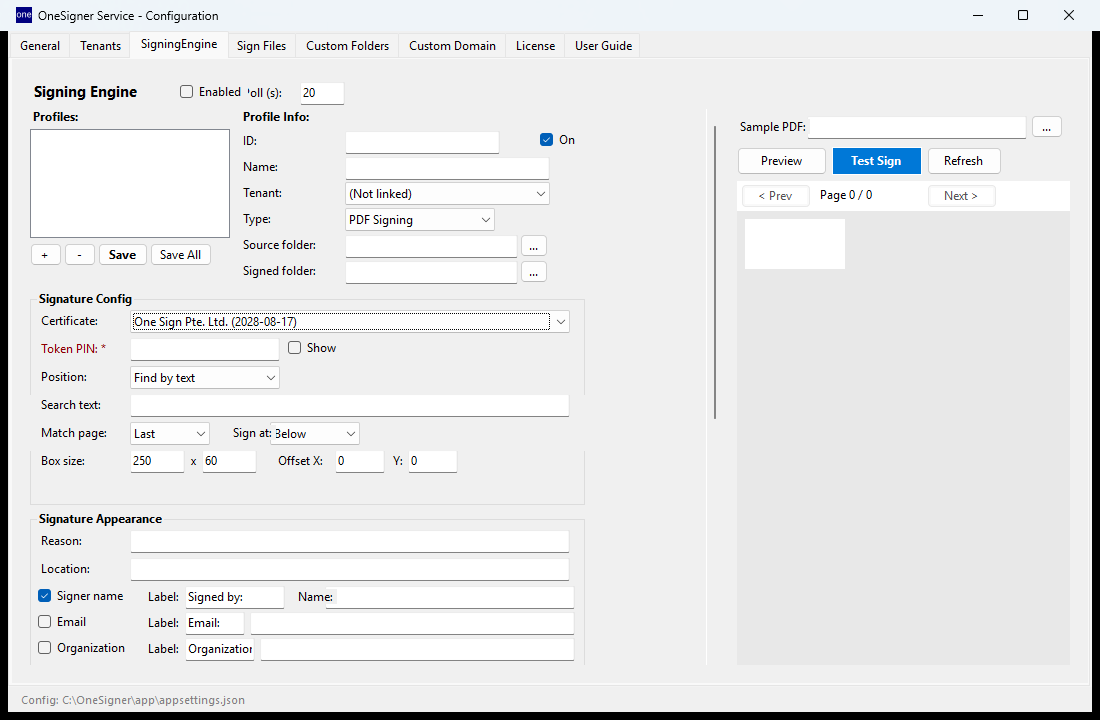
Profiles are the heart of OneSigner — each one says which certificate signs what, from where, and how the signature looks.
- Enabled + poll (s) — turns the folder-watch engine on; the service scans source folders at this interval.
- Profile Info — ID (letters/digits), Name, optional Tenant link, Type (PDF Signing, Code Signing or AKV Proxy), and the Source/Signed folders this profile watches.
- Signature Config — pick the Certificate from the Windows store (your USB token's cert — here One Sign Pte. Ltd.), enter the Token PIN (stored encrypted, entered automatically at signing time), and choose the Position: Find by text anchors the signature to a phrase in the document (set Search text, Match page, Sign at), or use a fixed page/coordinates. Box size and Offset X/Y fine-tune placement.
- Signature Appearance — Reason, Location, and optional lines for signer name, email and organization. See Signature Appearance.
- Test panel (right) — pick a Sample PDF, Preview the placement, then Test Sign to sign one file end-to-end before going live.
Press Save (or Save All) and restart the service. Deep dive: Signing Profiles.
6. Sign Files Tab — Batch Signing
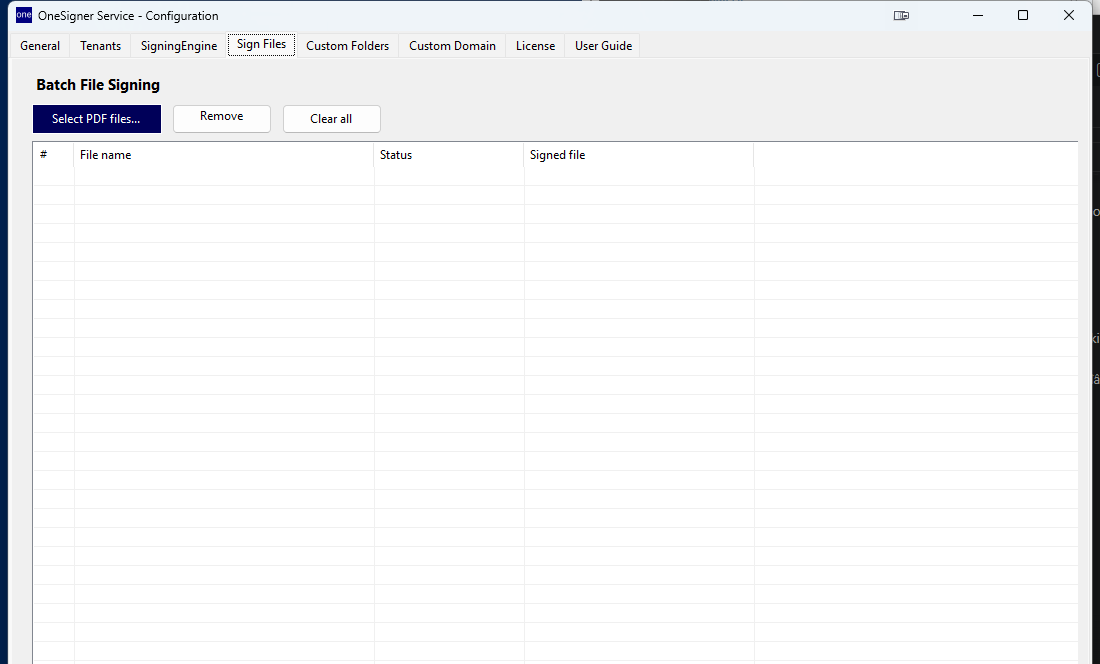
One-off jobs without touching folders or APIs: Select PDF files… (multi-select), and each file is signed with your default profile — the grid shows per-file status and the signed output path.
7. Custom Folders Tab
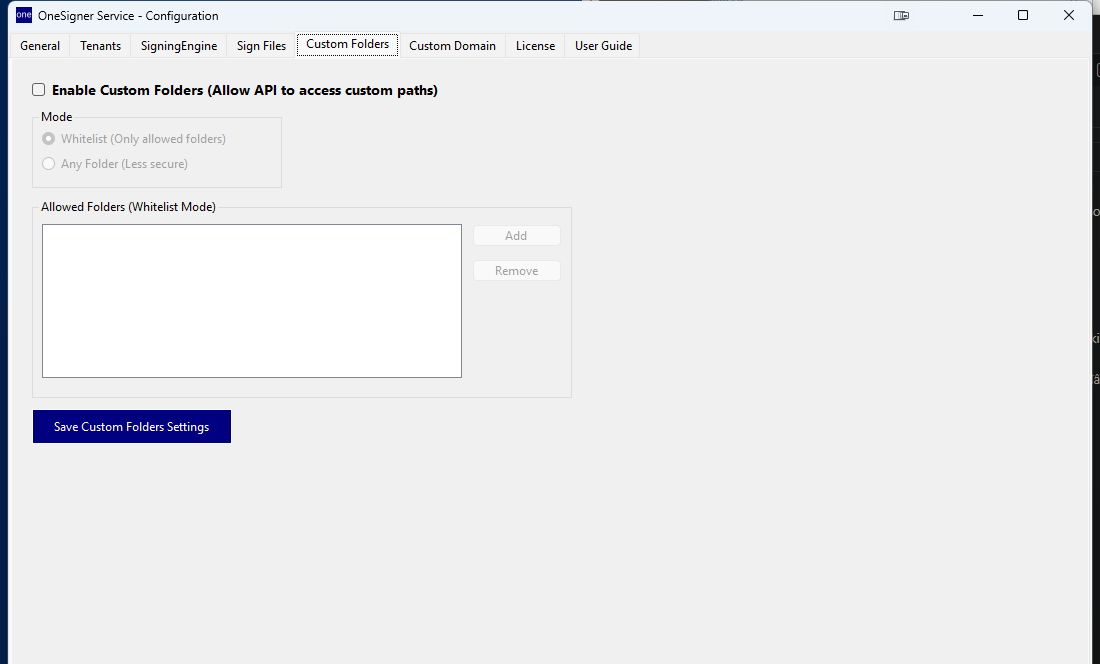
By default the API only reads/writes inside the configured upload/signed folders. Enable Custom Folders to let API calls target other paths (e.g. a network share your ERP writes to):
- Whitelist mode (recommended) — only the folders you Add to the list are allowed.
- Any Folder — no restriction; use only on a locked-down machine.
8. Custom Domain Tab — Public HTTPS Address
This tab gives OneSigner a public HTTPS address — so remote users, CI servers or eSign recipients can reach it as https://yourname.our-domain.com or https://sign.your-domain.com — with a valid TLS certificate and no router port-forwarding. There are two ways to get one:
Option A — Managed domain included with your license (easiest)
Dedicated step-by-step guide with real screenshots: Get a Free Custom Domain from Your License.
Every eligible OneSigner license can claim one subdomain on our infrastructure — no Cloudflare account, no domain purchase, nothing to configure on the DNS side. We provision the tunnel on our Cloudflare account and hand you the connector token:
- Sign in at onesign.sg → My Licenses → open Custom domain next to your license.
- Pick a base domain from the list and choose your subdomain — you can choose it only once (changing it later requires support), so pick carefully. Set the local port your app listens on (default
9440; ports 9200–9440 are accepted). - Click Create. The page shows Your public domain and a Tunnel token — keep the token secret; anyone who has it can serve traffic on your domain.
- In OneSigner Configuration → Custom Domain tab: click Download cloudflared (status turns to OK Found), paste the token into Tunnel Token, tick Enable Custom Domain, put your new address in Public URL, click Save Tunnel Settings and restart the service.
- Verify: open
https://your-subdomain.our-domain.com/portalfrom any network.
Notes: managed domains are available for paid licenses that are active and not expired. If the portal page says "Not available yet" or "at capacity", the rollout hasn't reached your account — contact support. If you later change the app's port, update it on the same portal page so the tunnel follows.
Option B — Your own domain (your Cloudflare account)
Prefer your own brand, e.g. sign.your-domain.com? Use a free Cloudflare account with your domain added:
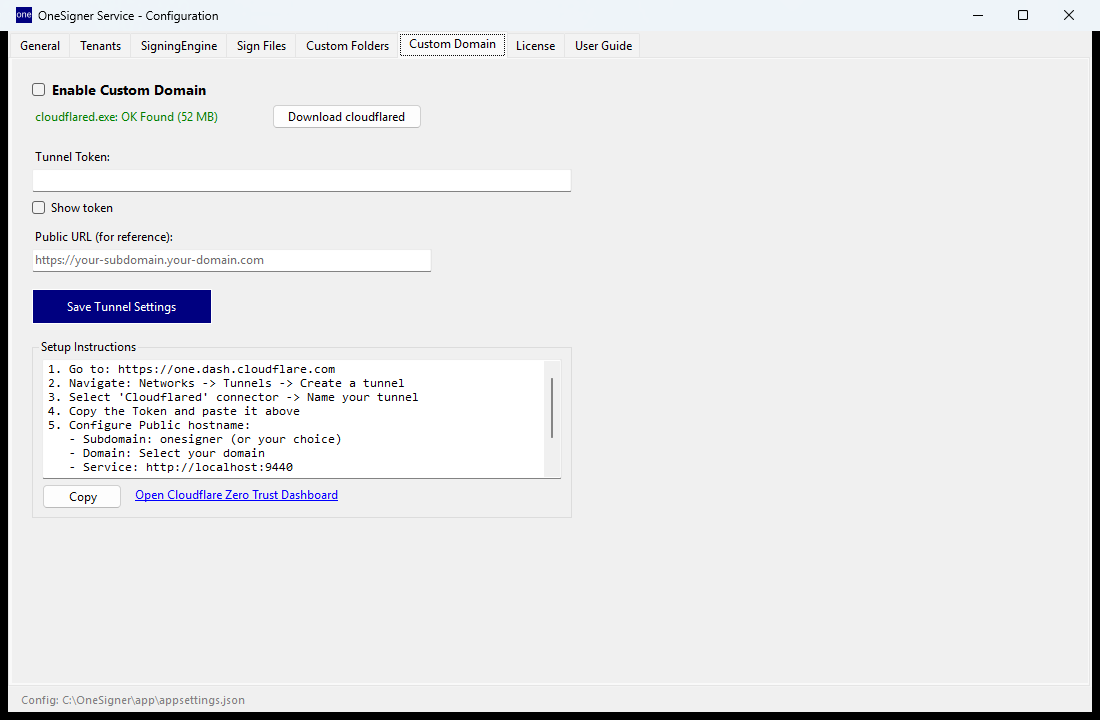
- Download cloudflared — click the button; the status turns to cloudflared.exe: OK Found (the connector is stored next to the app, ~52 MB).
- Open the Cloudflare Zero Trust dashboard → Networks → Tunnels → Create a tunnel → connector type Cloudflared → give it a name (e.g.
onesigner). - Cloudflare shows an install command containing a long token (
eyJ…). Copy just the token and paste it into Tunnel Token (tick Show token to double-check). - Still in Cloudflare, add a Public hostname for the tunnel: choose a subdomain (e.g.
sign) and your domain, and set Service tohttp://localhost:9440(use your port). Cloudflare creates the DNS record automatically. - Back in OneSigner: tick Enable Custom Domain, optionally note the address in Public URL, click Save Tunnel Settings and restart the service. The service now launches and supervises cloudflared for you.
Verify: open https://sign.your-domain.com/portal from any network — the portal login should load over HTTPS. All traffic flows outbound from your machine to Cloudflare (port 7844), so no inbound firewall rule is needed.
Troubleshooting (both options): a Cloudflare error 1033 or "tunnel not found" means the token is wrong or the tunnel isn't connected — re-copy the token and restart the service; check that outbound port 7844 isn't blocked. Option B users can see tunnel health in the Zero Trust dashboard under Networks → Tunnels; Option A users can simply re-open the portal's Custom domain page or contact support.
9. User Guide Tab
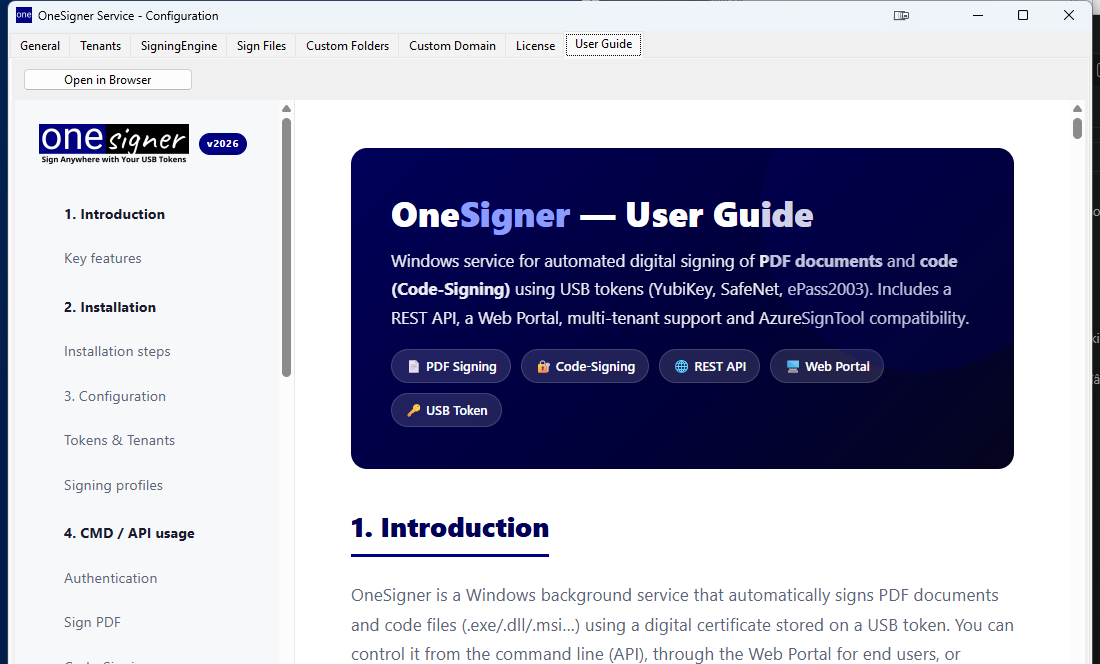
The full product manual ships inside the app — browse it here or click Open in Browser. It covers CMD/API usage, authentication and code-signing flags offline.
Applying Changes
Rule of thumb: Save writes appsettings.json, and the running service picks changes up after a Restart (Service Control, or from an admin terminal):
net stop OneSignerService && net start OneSignerService
# or
Restart-Service OneSignerService -Force
Installation, service management, logs and debugging: Installation Guide.