1 Create your account and download OneSigner
Sign in to onesign.sg, collect your licence key and download the installer package.
- Go to /portal/download and sign in — register with an email address or use Sign in with Google. An account is required before the download becomes available.
- Download the OneSigner Service + GUI package. This single installer contains both the background signing service and the configuration app.
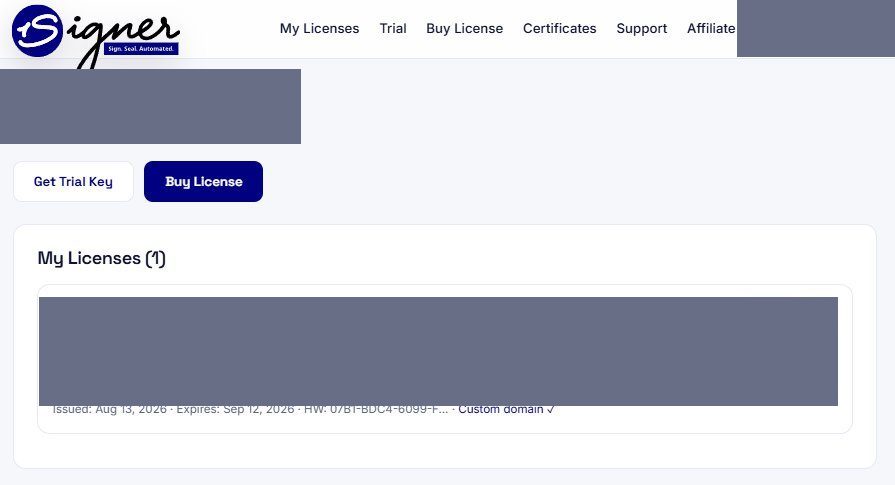
- Open My Licenses in the portal. A free 30-day trial key is issued to every new account — you can also request one at /portal/trial. Keep this page open; you will paste the key into the app in step 3.
Note: OneSigner signs PDF documents (PDF Signing) and software (Code Signing) using the certificate stored on your USB token. It can sign locally on the machine where it is installed, or remotely through the web portal and the command line.
2 Install OneSigner
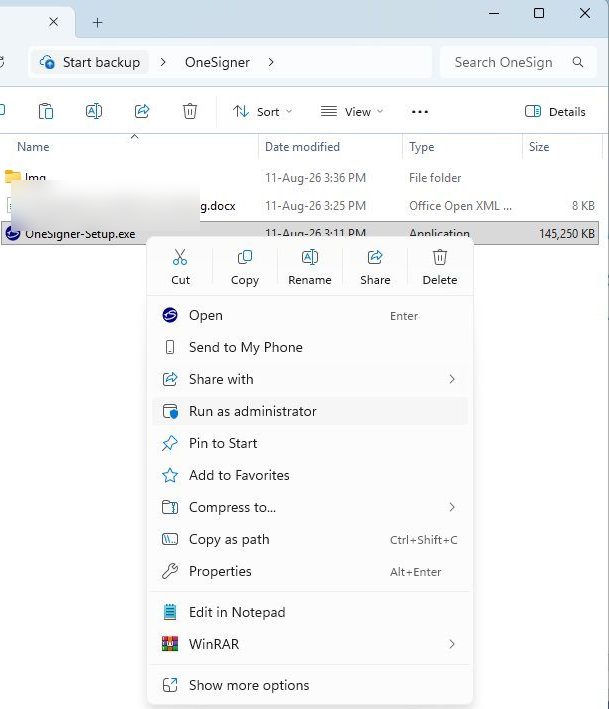
Run the installer with administrator rights and install to the default folder.
- Find
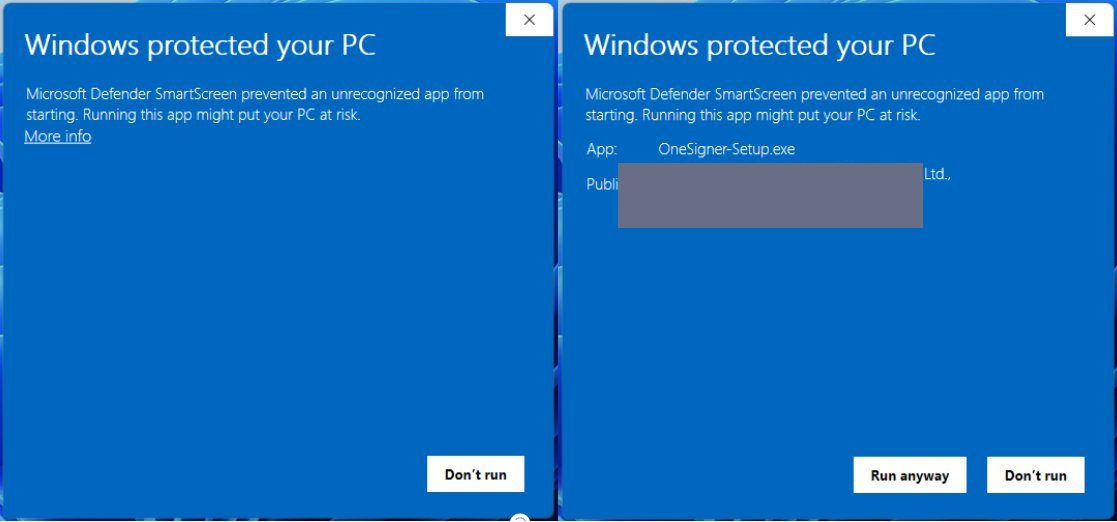
OneSigner-Setup.exein your Downloads folder, right-click it and choose Run as administrator. - If Windows shows the Windows protected your PC popup, click More info, then Run anyway. If the popup does not appear, skip this.
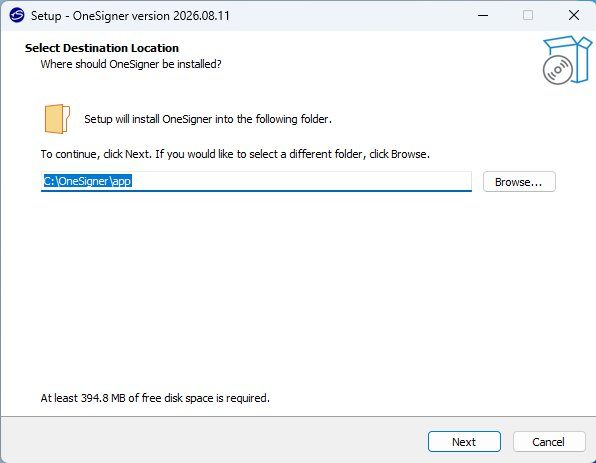
- In the setup window, keep the default install folder
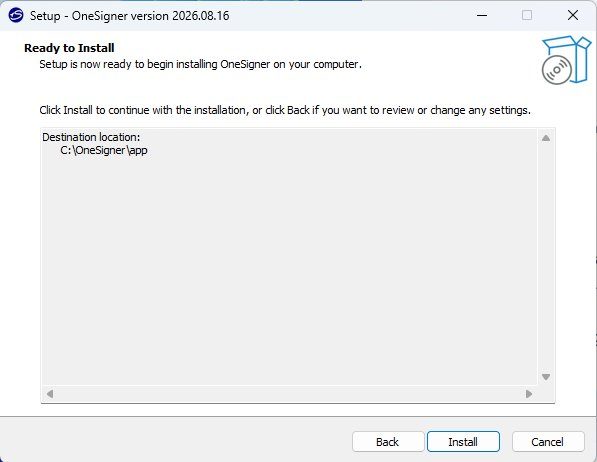
C:\OneSigner\app, then click Next and Install. - Wait while the progress bar completes — do not click anything. Setup moves on by itself; click Next to continue.
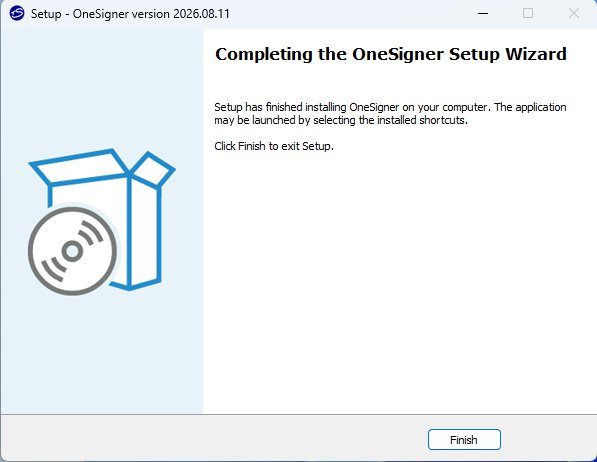
- When setup reports that installation has finished, click Finish.
C:\OneSigner\app, then click Next and Install.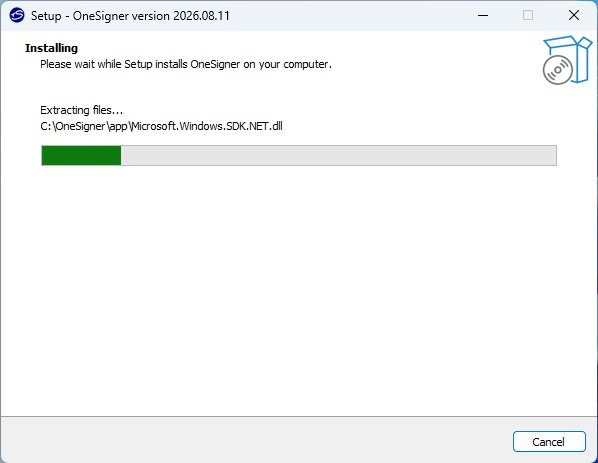
3 Activate your licence key
Paste the key from your portal account into the app to complete activation.
- Sign in to onesign.sg with the account you created and open My Licenses.
- Copy your licence key.
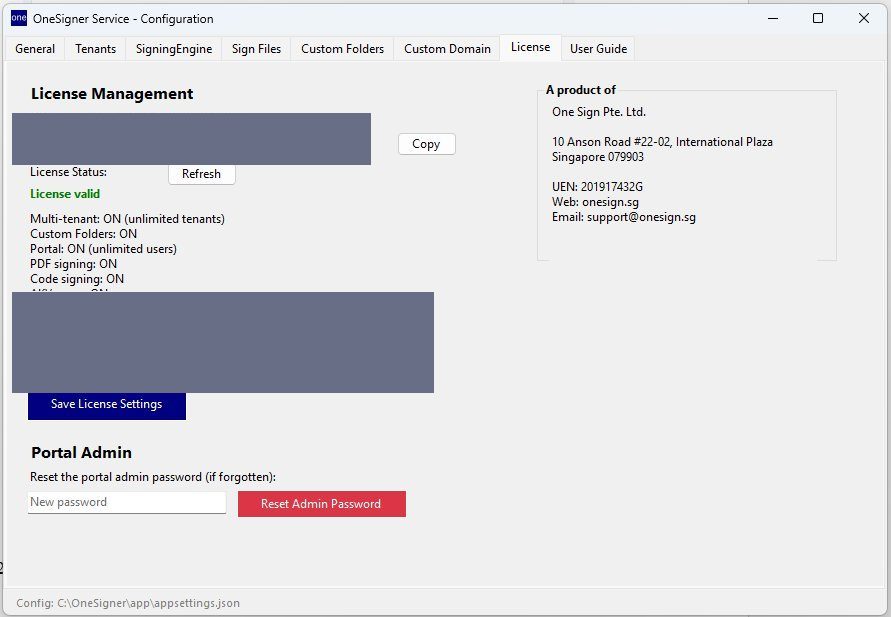
- Open the OneSigner app on your machine and go to the License tab.
- Paste the key into the License Key box and click Save License Settings.
4 Install your USB token driver
Windows must recognise the USB token before OneSigner can use the certificate stored on it.
- Install the driver supplied by your token vendor on the same machine where OneSigner is installed.
- Plug the USB token in and confirm the vendor's own management app detects it.
Note: This guide covers SafeNet and YubiKey because those are the tokens we use. Other brands work the same way — install that vendor's driver instead. See the Knowledge Base if your device is not listed here.
SafeNet
- Download and install the SafeNet Authentication Client for Windows from your certificate provider.
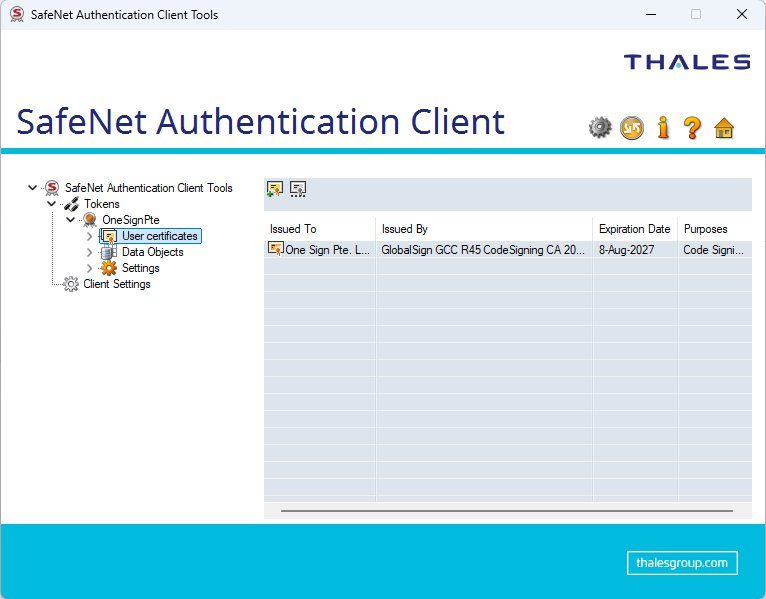
- Plug the token in and open SafeNet Authentication Client to check that the device and its certificate are listed.
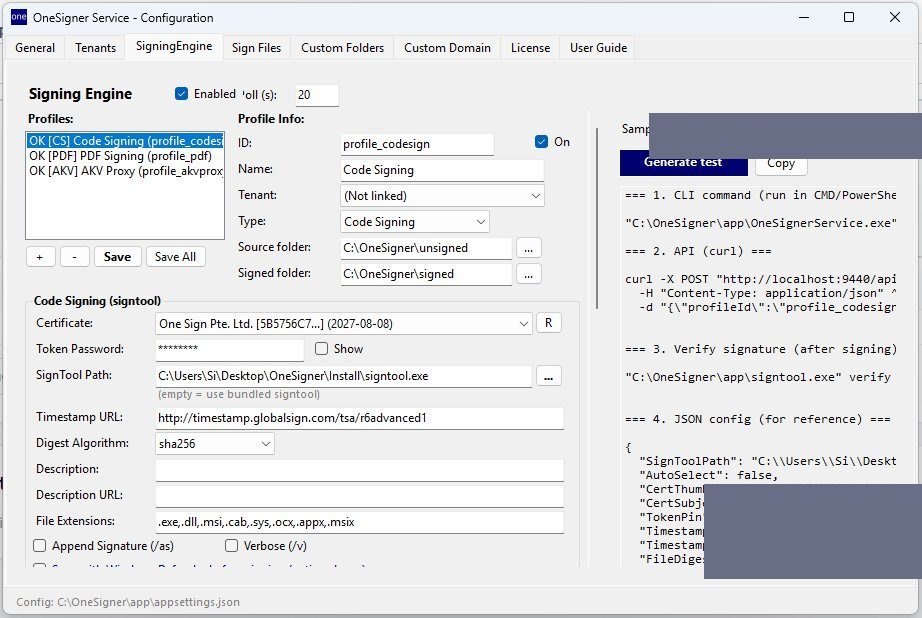
- In OneSigner, open the SigningEngine tab and click the refresh button on the Certificate row to pick up the token.
YubiKey
- Download and install YubiKey Manager and the YubiKey Smart Card minidriver that match your version of Windows.
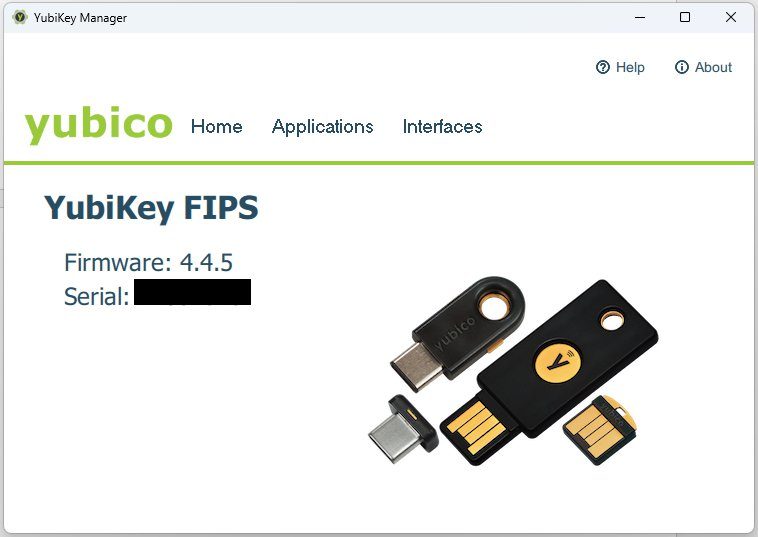
- Plug the key in and open YubiKey Manager to confirm it is detected.
- Back in OneSigner, refresh the Certificate list and check that the YubiKey certificate appears.
5 Configure the service on the General tab
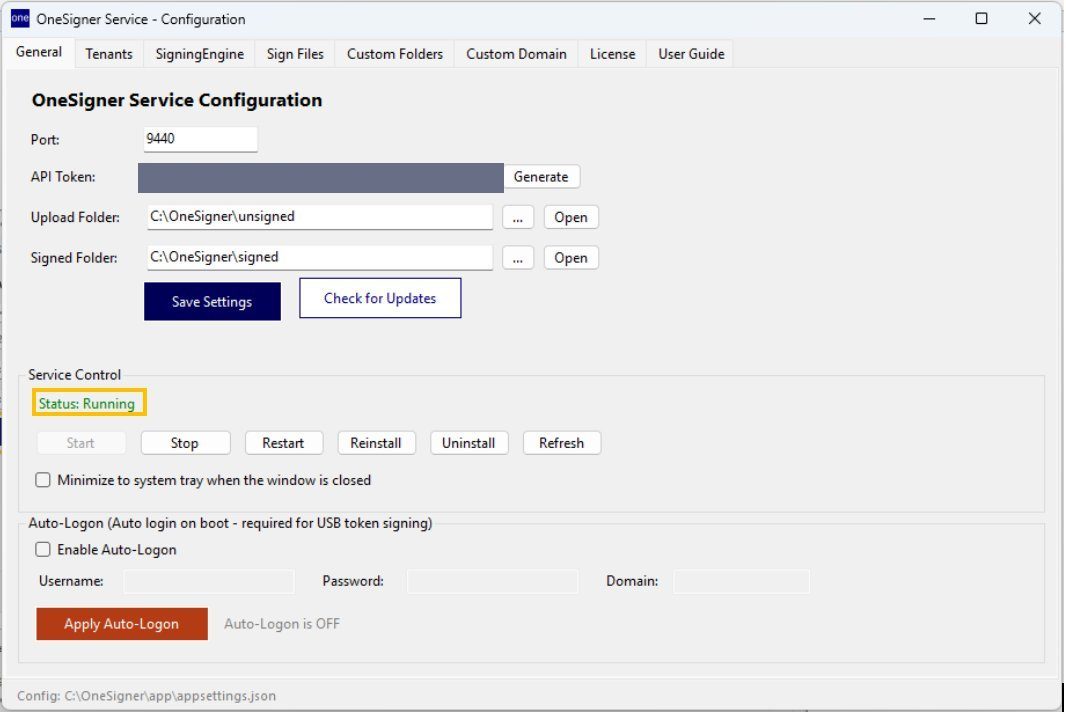
Set the port, API token and watched folders, then confirm the service is running.
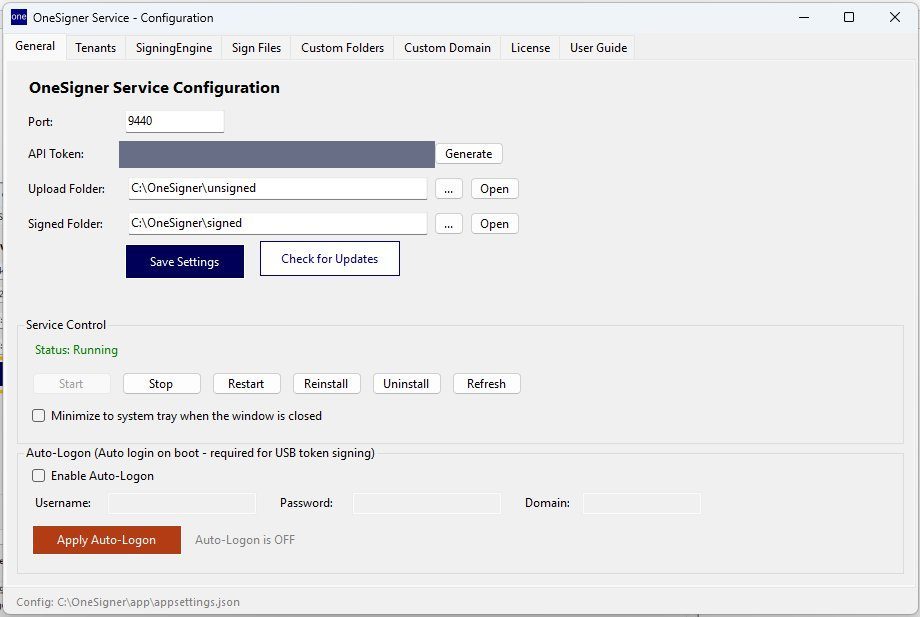
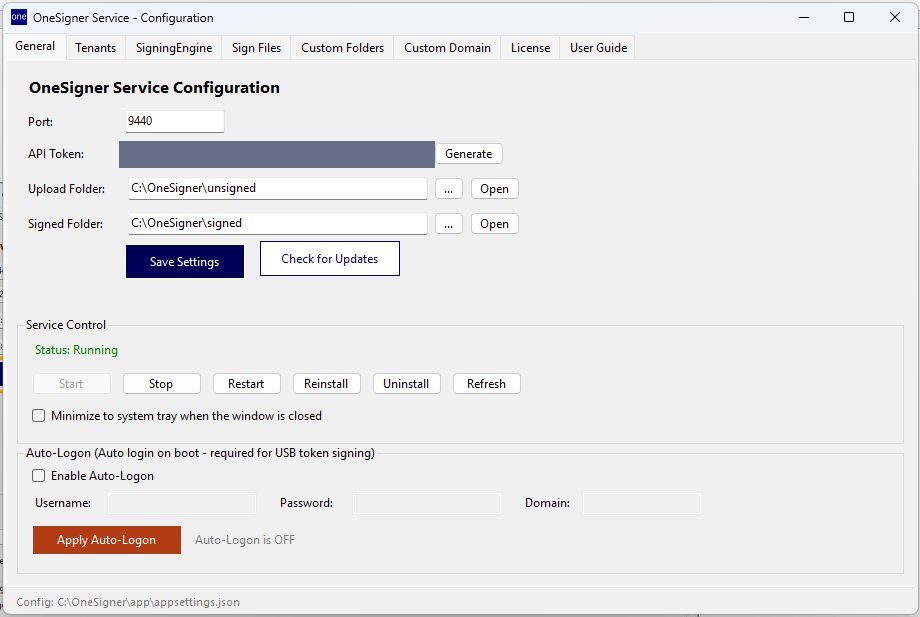
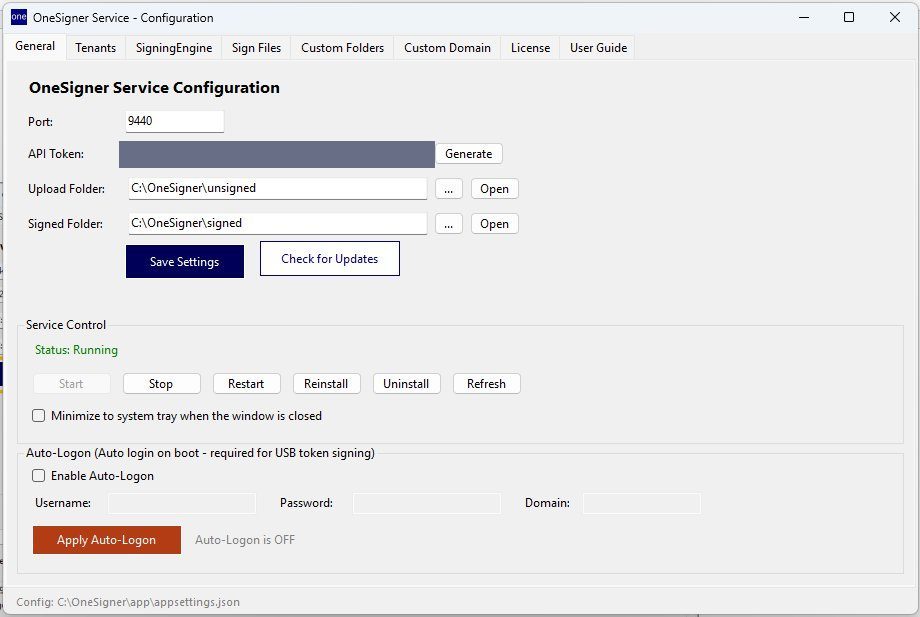
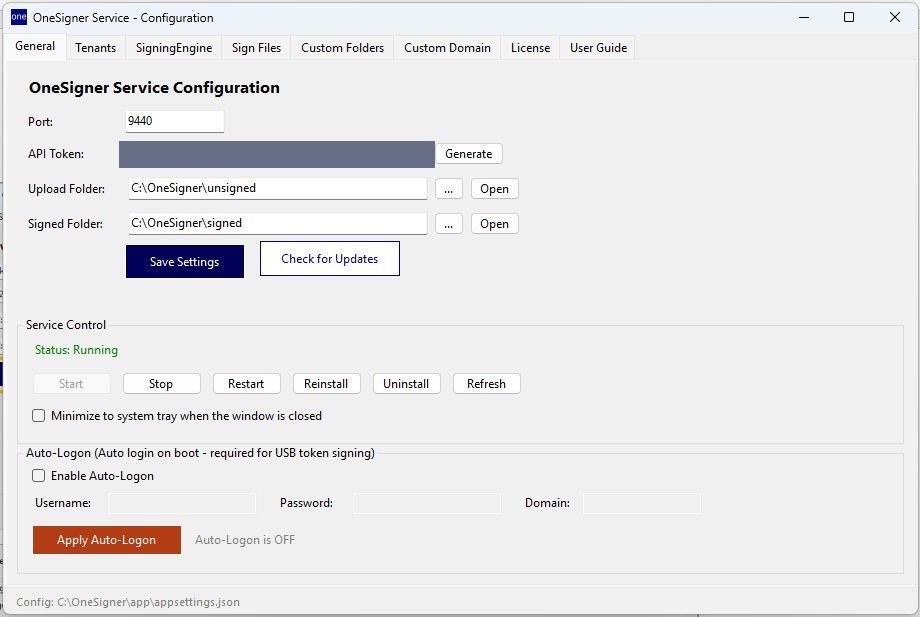
- Open the OneSigner Service app and go to the General tab.
- Set Port to
9440. - Click Generate next to API Token to create a token.
- Set Upload Folder to
C:\OneSigner\unsigned. - Set Signed Folder to
C:\OneSigner\signed. - Click Save Settings, then click Restart.
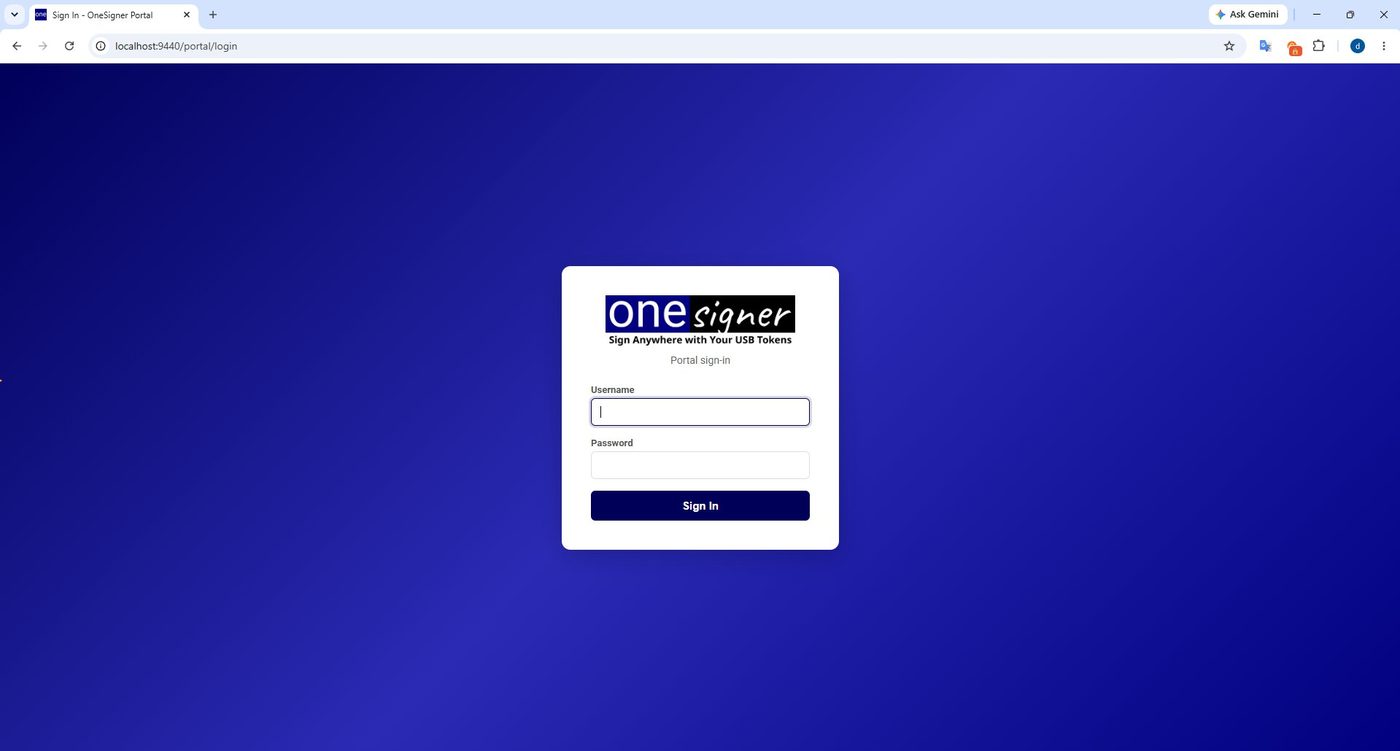
- Open a browser and go to
localhost:9440. If the OneSigner sign-in page appears, the service is running correctly.
localhost:9440.Note: SigningEngine is where you create the profiles used for signing. OneSigner supports three profile types: PDF Signing for PDF documents, Code Signing for software (.exe, .dll, .msi, .cab, .sys and similar), and AKV Proxy for remote code signing over HTTPS with OneSignTool. Every time you create or edit a profile you must return to the General tab and click Restart to apply the change.
6 Create a PDF signing profile
Define which certificate signs your PDFs, where the signature is placed and which folders are watched.
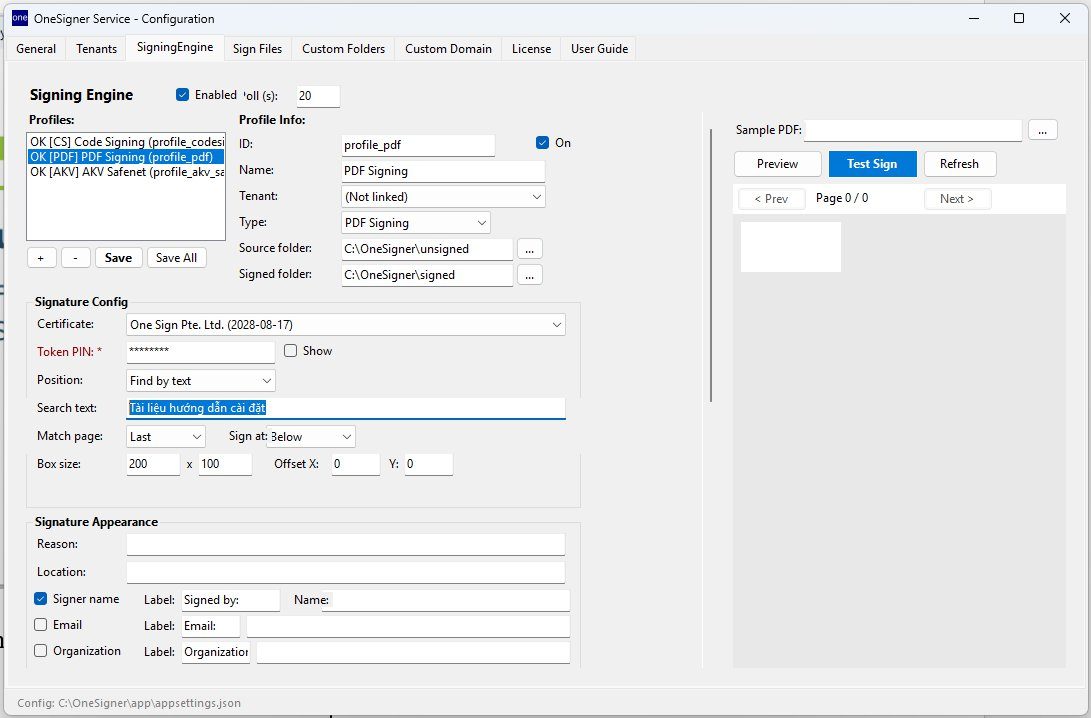
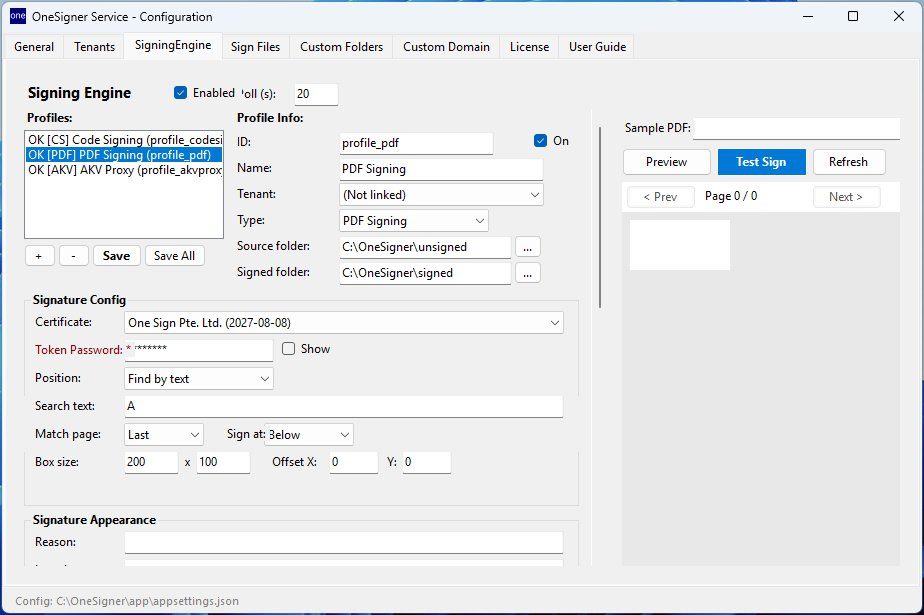
- Go to the SigningEngine tab and click + under Profiles.
- Under Profile Info, set ID to
profile_pdf, Name toPDF Signing, Tenant to Not linked and Type to PDF Signing. - Set Source Folder to
C:\OneSigner\unsignedand Signed Folder toC:\OneSigner\signed. - Under Signature Config, choose the certificate in Certificate — with the USB token plugged in, the matching certificates are listed.
- Enter the token credentials in Token PIN / Token Password.
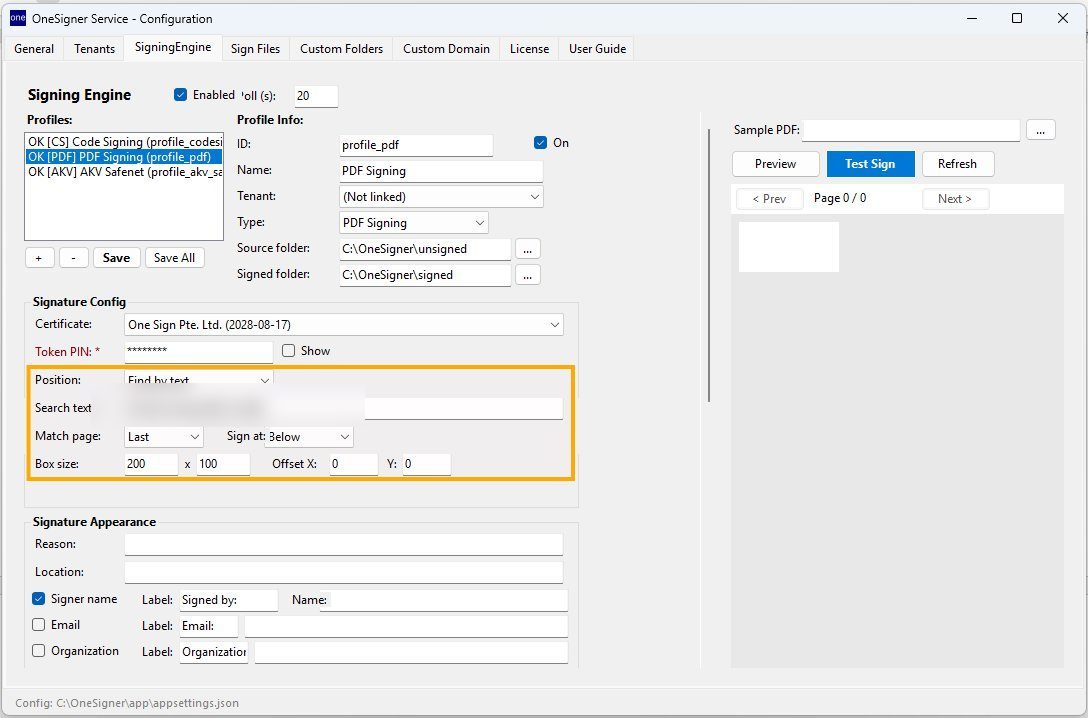
- Set Position — either a fixed signature position, or automatic placement after a chosen piece of text.
- Click Save to store the profile.
- Go to the General tab and click Restart to apply it.
Note: The credential field is labelled either Token PIN or Token Password, depending on the token and certificate OneSigner detects. Enter whichever credential your token uses.
7 Create a code signing profile
Set up Authenticode signing for executables and installers using signtool and your token. New to EV code signing? Start with the requirements guide.
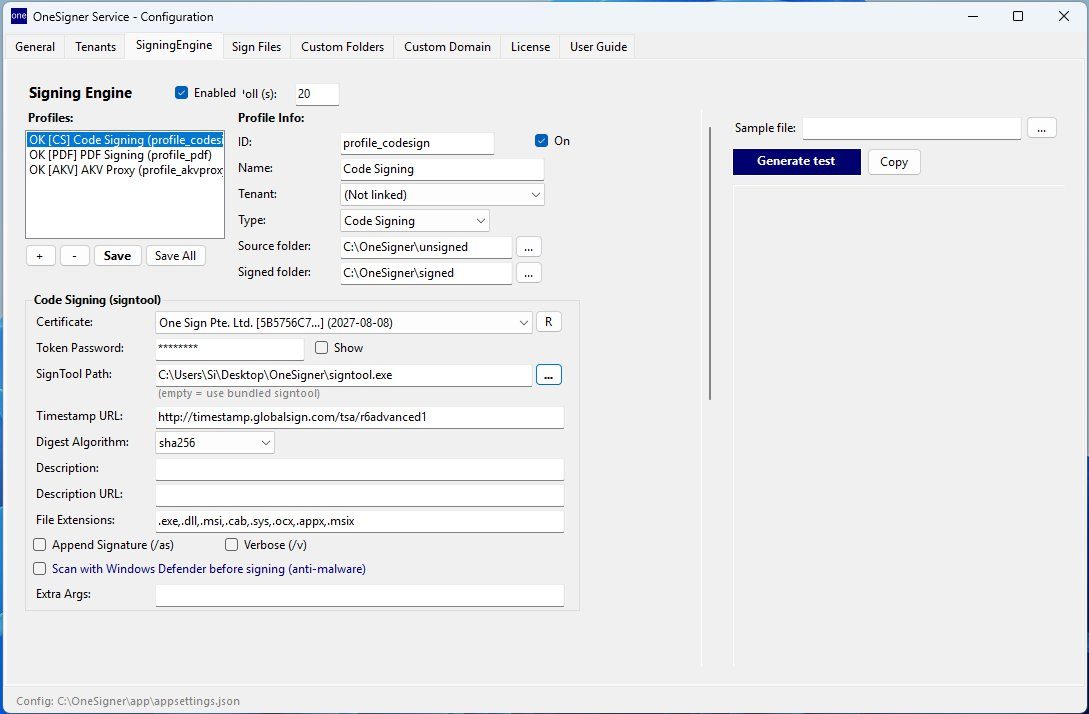
- Go to the SigningEngine tab and click + under Profiles.
- Under Profile Info, set ID to
profile_codesign, Name toCode Signing, Tenant to Not linked and Type to Code Signing. - Set Source Folder to
C:\OneSigner\unsignedand Signed Folder toC:\OneSigner\signed. - Under Code Signing (signtool), select the token certificate in Certificate and enter the Token PIN / Token Password.
- Set SignTool Path to
C:\OneSigner\signtool.exe. If you do not have the tool yet, download it first and point the field at the downloaded file. - Set Position — fixed or automatic.
- Set Timestamp URL to the timestamping service of the CA that issued your token certificate — check the Issued by field of the certificate.
- Click Save, then go to the General tab and click Restart.
Note: Timestamp URLs change from time to time. To be sure, search the CA's own site for "<CA name> signtool code sign timestamp URL". Common values (SHA-256 recommended): DigiCert http://timestamp.digicert.com; Sectigo / Comodo http://timestamp.sectigo.com; GlobalSign http://timestamp.globalsign.com/tsa/r6advanced1; SSL.com http://ts.ssl.com; Microsoft Trusted Signing http://timestamp.acs.microsoft.com.
Note: As with PDF profiles, the credential field is labelled Token PIN or Token Password depending on the token and certificate detected.
8 Set up the Azure Key Vault proxy profile (optional)
Add an AKV Proxy profile so build machines can code-sign remotely over HTTPS with OneSignTool.
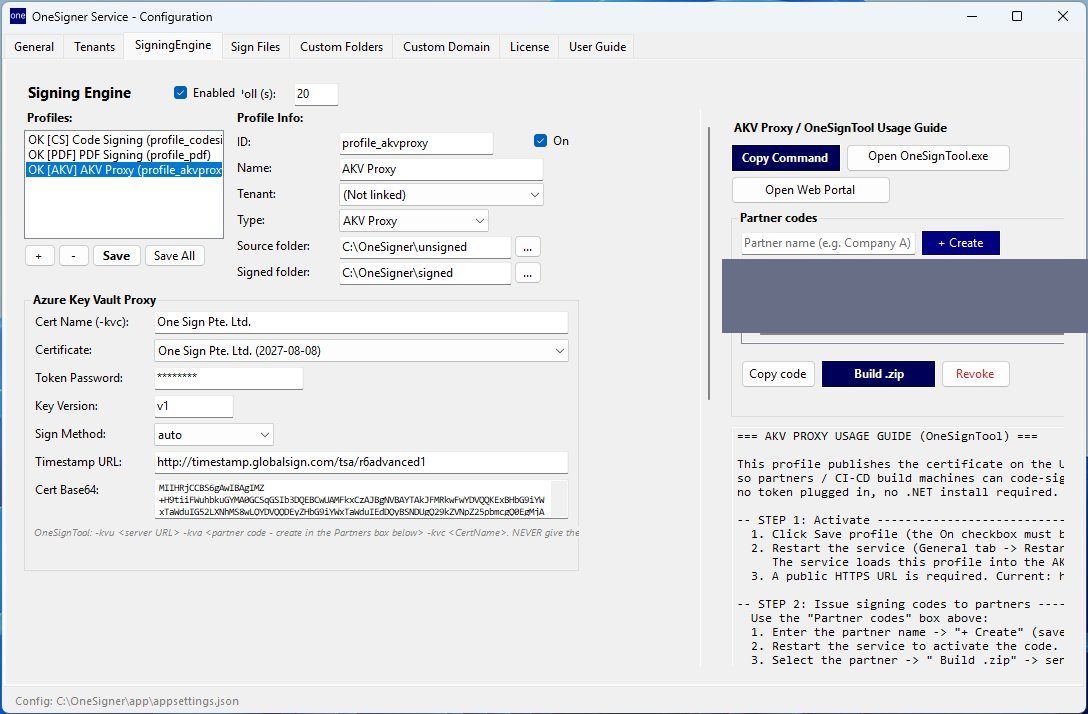
- Go to the SigningEngine tab and click + under Profiles.
- Under Profile Info, set ID to
profile_akvproxy, Name toAKV Proxy, Tenant to Not linked and Type to AKV Proxy. - Set Source Folder to
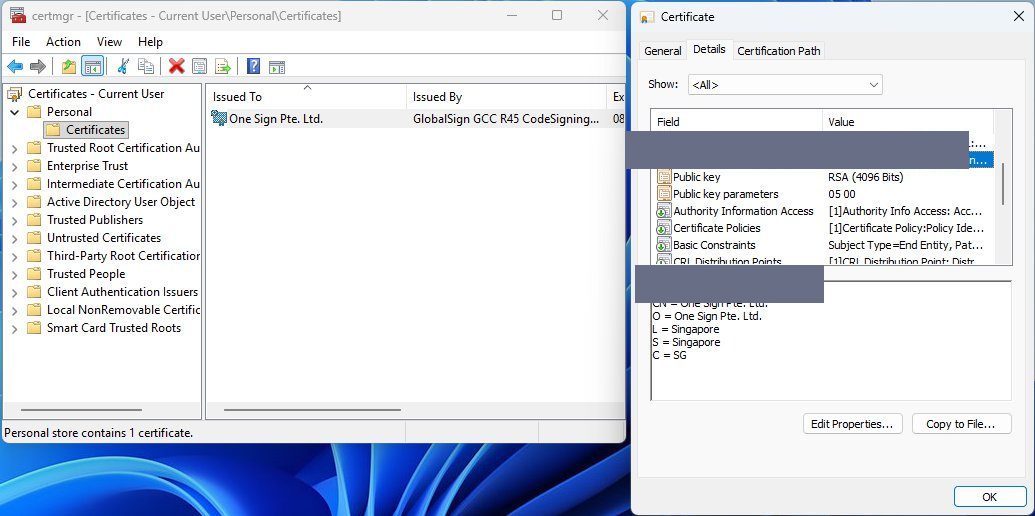
C:\OneSigner\unsignedand Signed Folder toC:\OneSigner\signed. - Under Azure Key Vault Proxy, fill in Cert Name (-kvc). Any name works; using the certificate's CN keeps it recognisable. To find it, press Win + R, run
certmgr.msc, locate the certificate of the token you have plugged in, open Details > Subject, then copy theCNvalue into the field. - Select the token certificate in Certificate and enter the Token PIN / Token Password.
- Set Sign Method to
auto. - Set Timestamp URL to the timestamping service of the CA that issued your certificate.
- Click Save, then go to the General tab and click Restart.
Note: The credential field is labelled Token PIN or Token Password depending on the token and certificate detected.
9 Publish a public domain with the managed tunnel (optional)
Give your OneSigner machine a public HTTPS address so you can sign from anywhere.
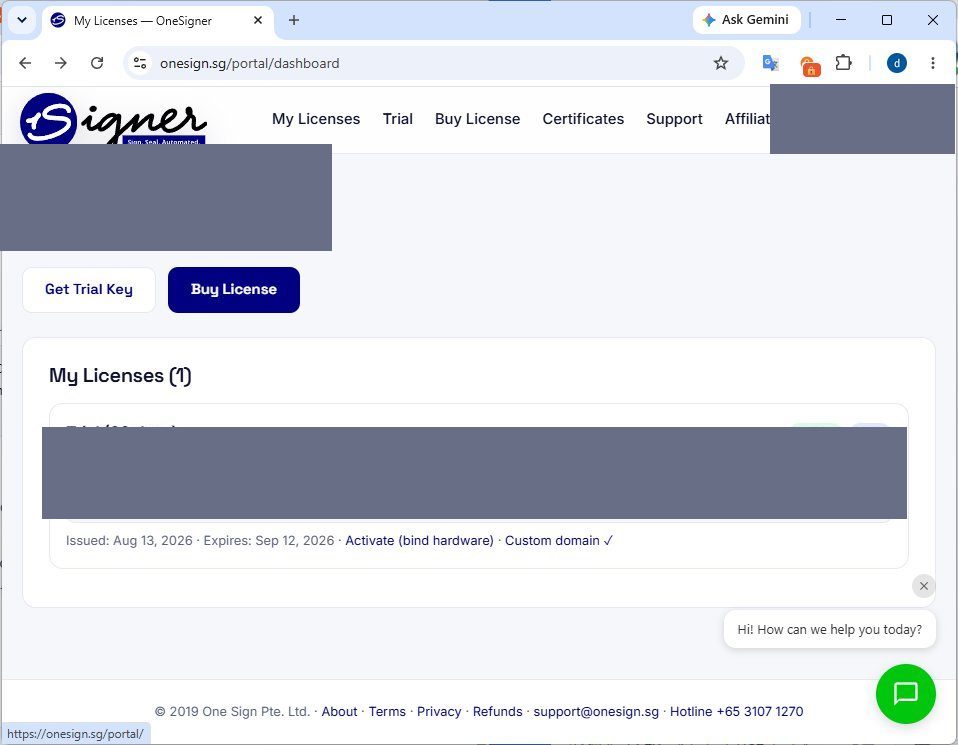
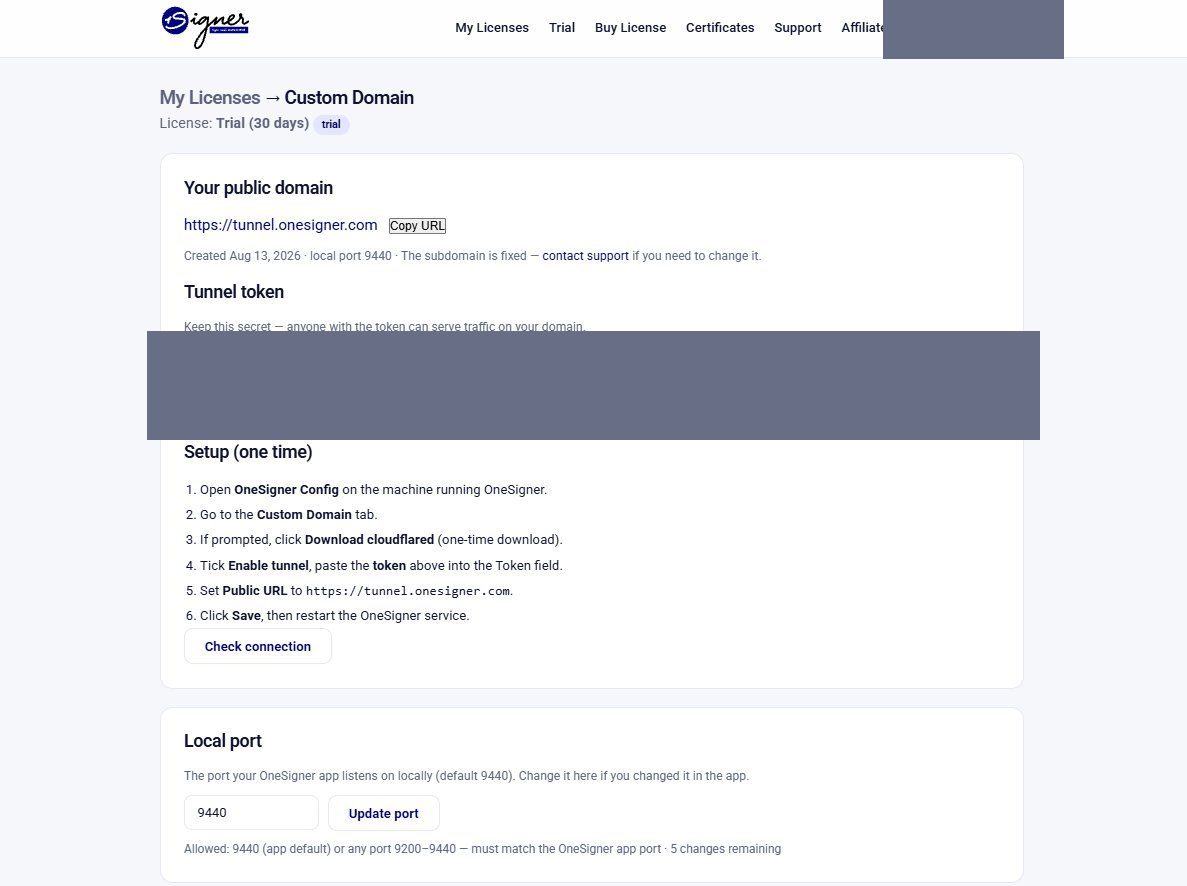
- Sign in to the OneSign website, open My Licenses and click Custom domain.
- Create the public domain you want and set the port. Once it is created, copy the URL and the Tunnel token.
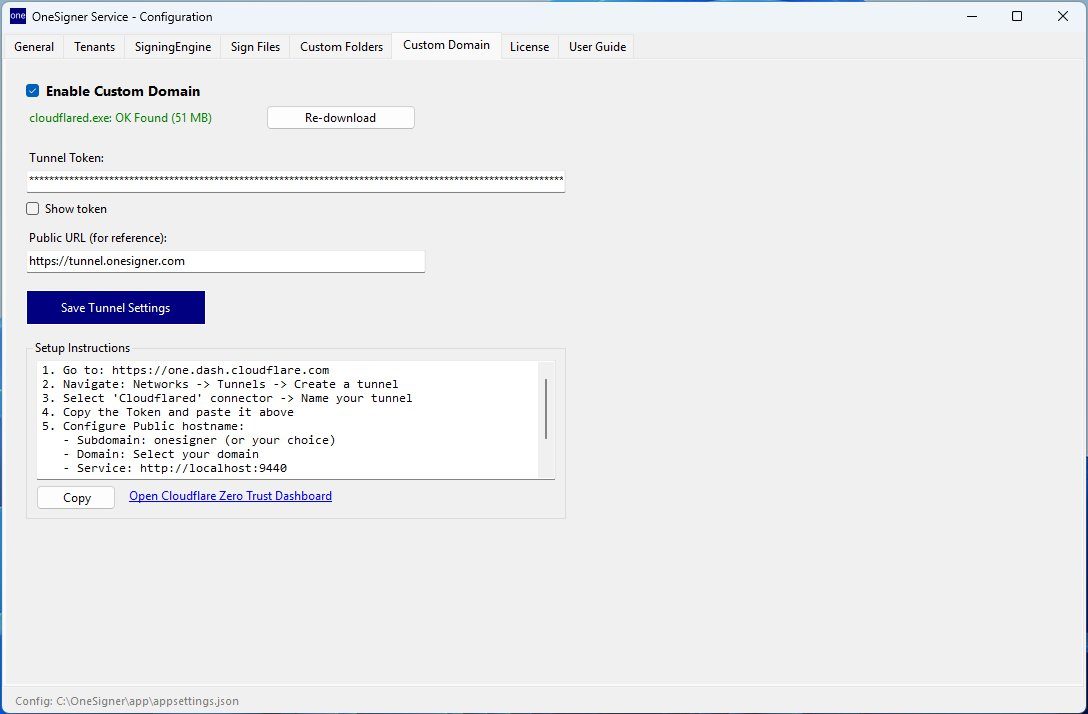
- In the OneSigner app on your machine, open the Custom Domain tab. Tick Enable Custom Domain and download Cloudflare when prompted.
- Paste the URL and the tunnel token into their fields, then click Save Tunnel Setting.
- Go to the General tab and click Restart to finish.
- Open the new public domain in a browser. If the OneSigner sign-in page loads, the tunnel is working.
10 Test PDF signing locally with the watched folder
Fine-tune the signature position with a test sign, then sign for real by dropping files into the watched folder.
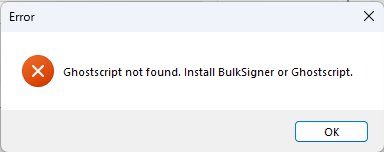
Note: Local signing needs either Ghostscript or BulkSigner installed on the machine — one of the two is enough. Without either, signing fails with the error shown below.
Check the signature position with a test sign
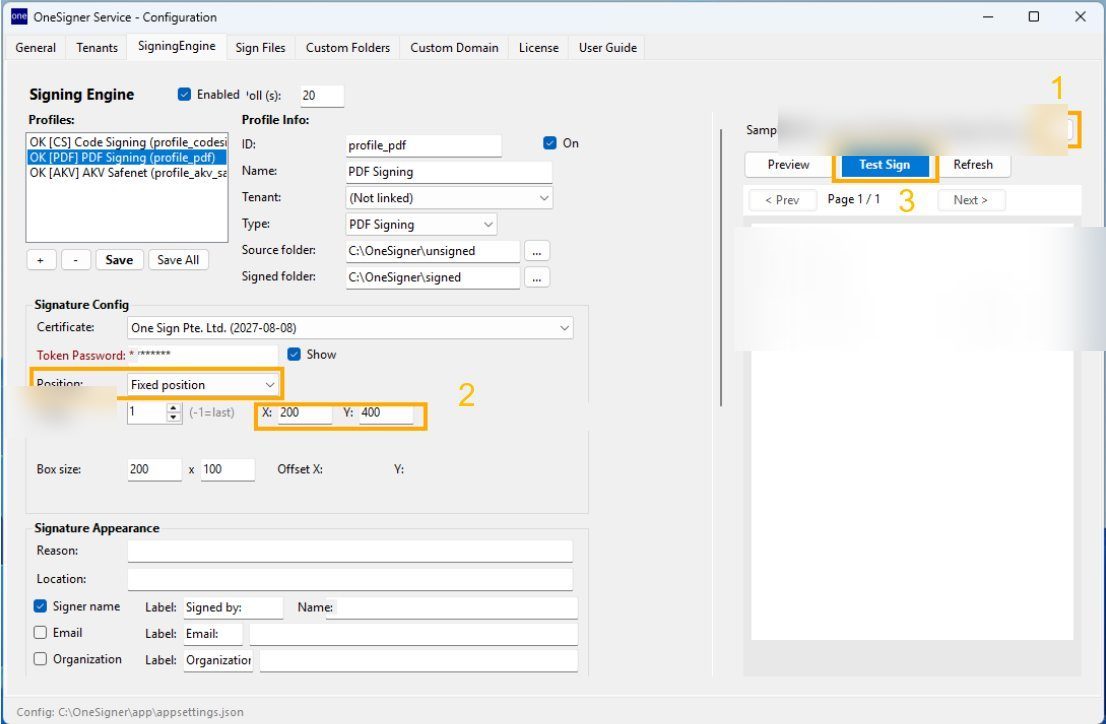
- Go to the SigningEngine tab, select profile-pdf under Profiles, then click the … button to add the PDF you want to test with.
- Under Signature Config, adjust Position and Page — the X and Y coordinates decide where the signature lands. Then go to General and click Restart to apply the change.
- Click Test Sign.
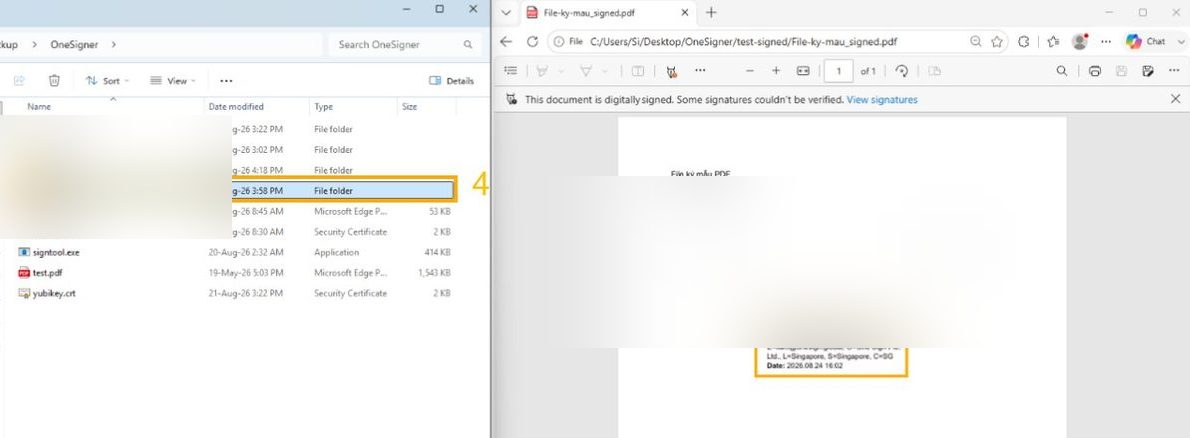
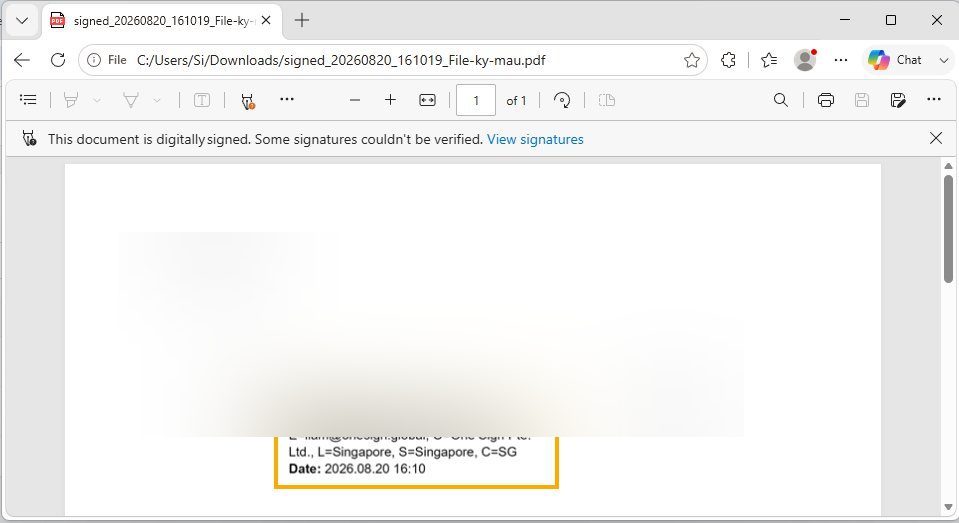
- Open the test-signed folder — it sits alongside your test PDF — and open the signed sample.
- Repeat the previous three steps, adjusting the position each time, until the signature sits exactly where you want it.
Sign for real
- Open the OneSigner app and check on the General tab that Status reads Running. If it is not running, click Start.
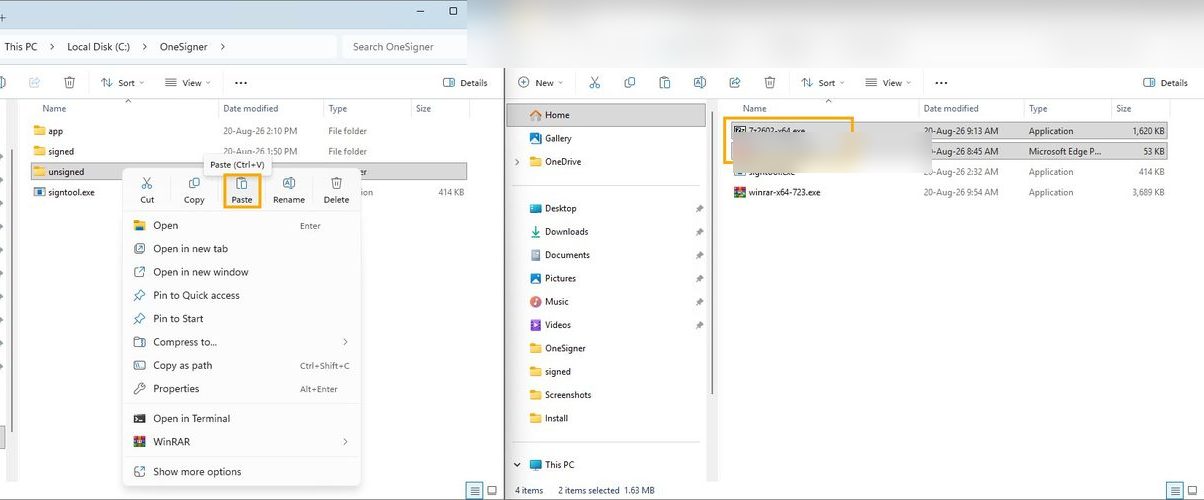
- Copy the files you want to sign into
C:\OneSigner\unsigned. Files are signed automatically as soon as they land in the folder. - Wait a moment, then open
C:\OneSigner\signed. Signed files move from unsigned to signed — open one and confirm the signature is present.
C:\OneSigner\unsigned.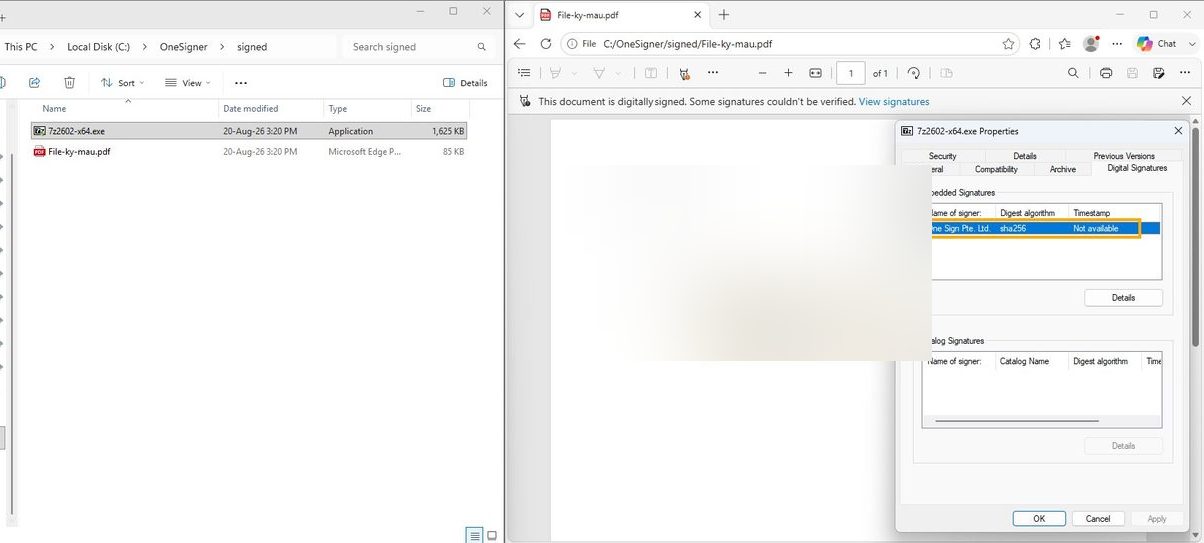
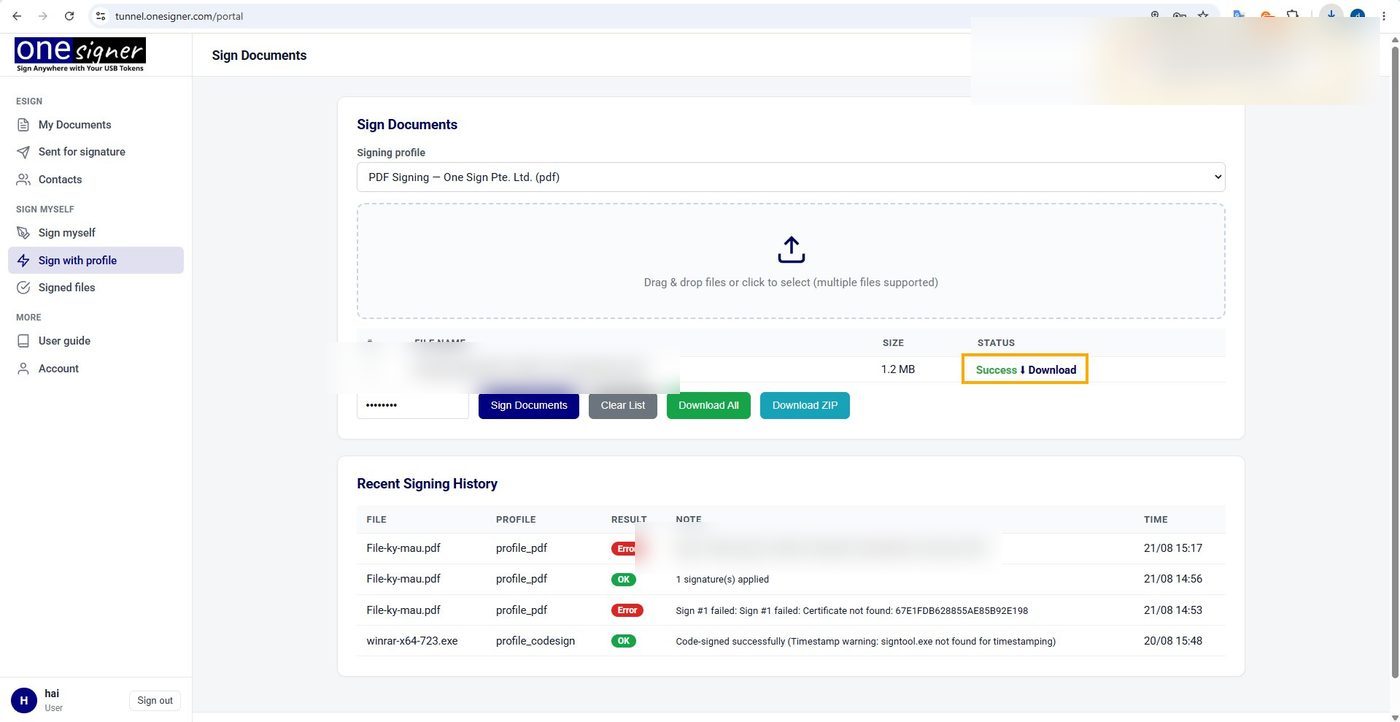
11 Sign remotely from the web portal
Upload documents from any machine and sign them with the token plugged into your OneSigner host.
- On the machine with the USB token, open OneSigner and check on the General tab that Status is Running. If not, click Start.
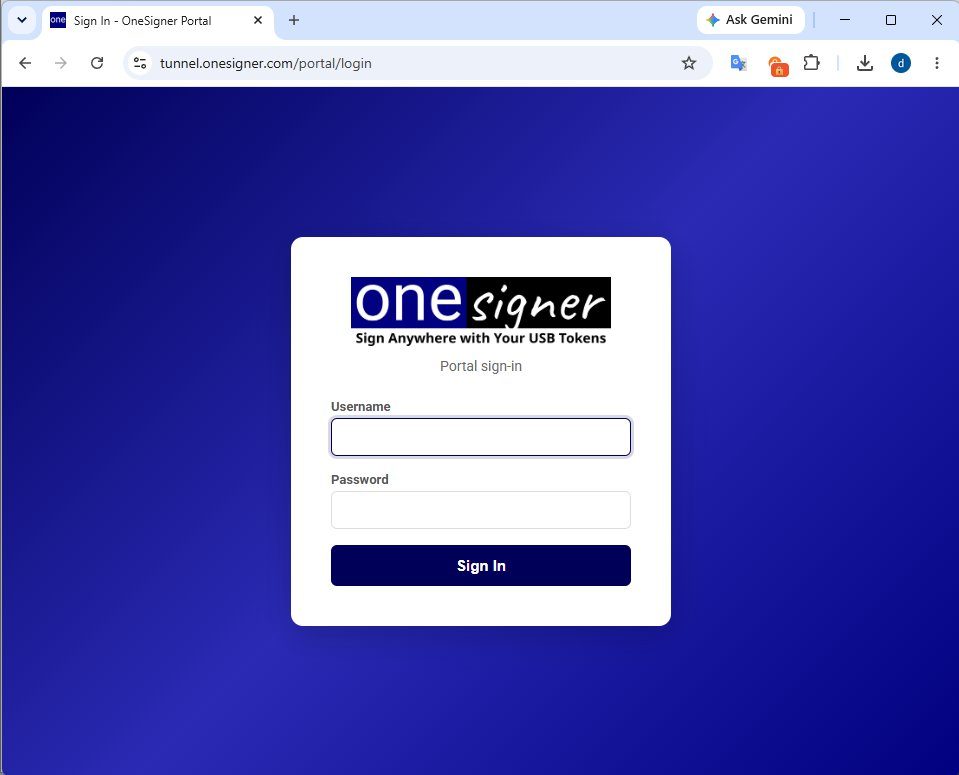
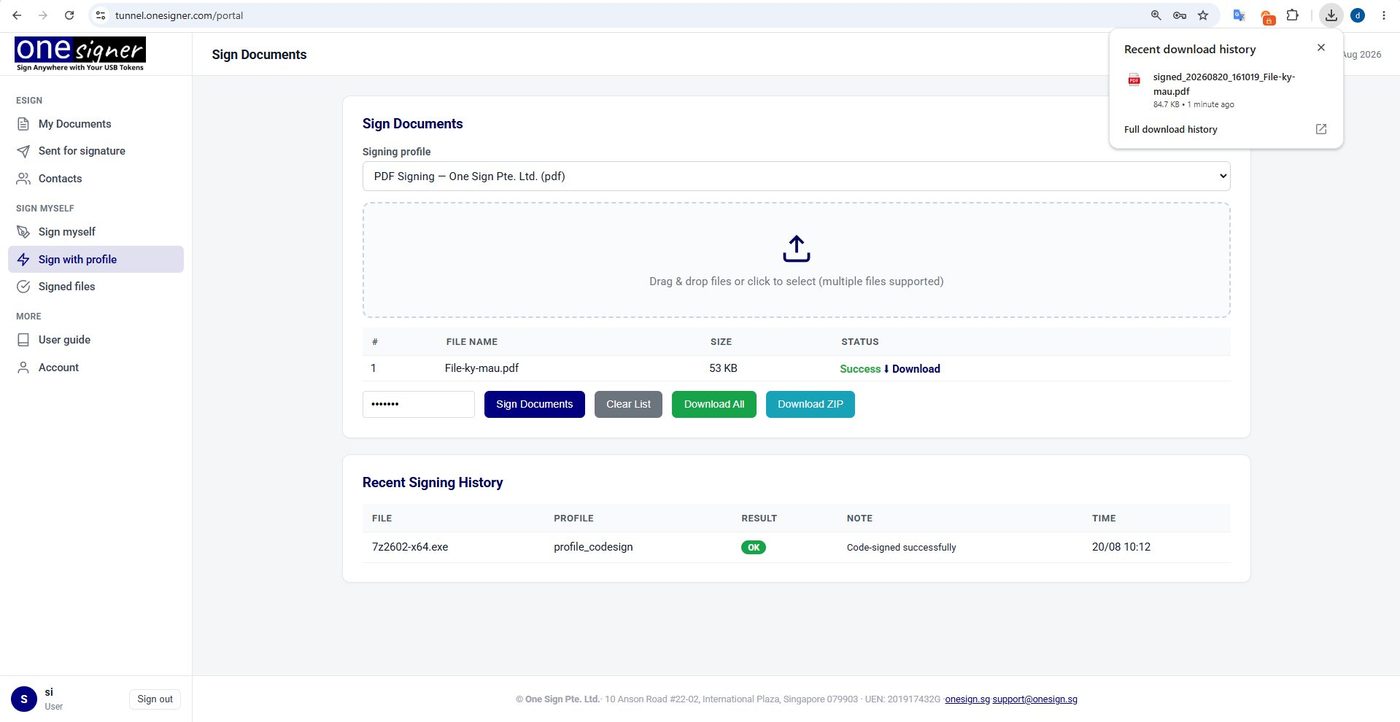
- From another machine, open a browser and go to your public domain — for example
https://tunnel.onesigner.com. - Sign in. The default username and password are both
admin. - Click the Sign Documents menu.
- Choose the profile to use in Signing profile — PDF signing or code signing.
- Click Choose files and upload one or more files.
- Enter the USB token PIN in Signing Pin.
- Click Sign Documents. Each file reports Success, or Error with the reason if it fails.
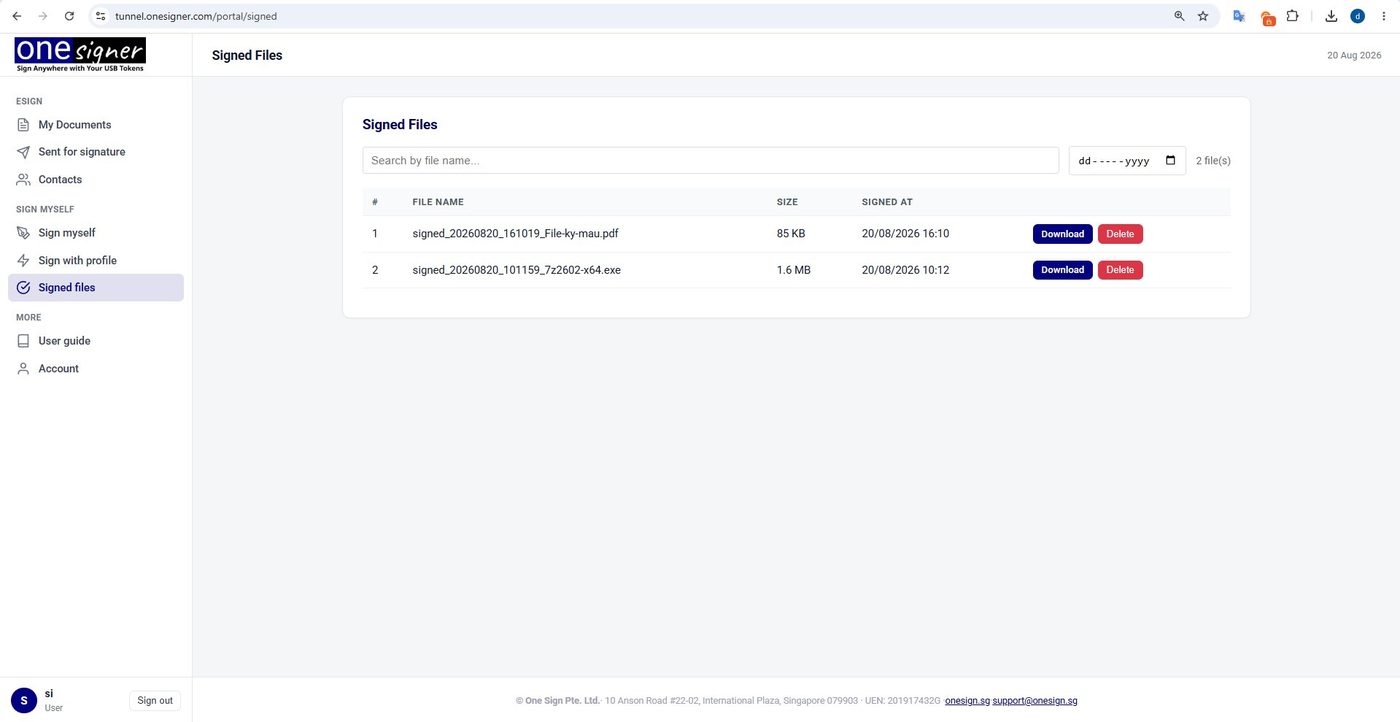
- Open Signed files to download the signed documents.
Note: Change the default password the first time you sign in — either in the portal, or in the OneSigner app on the License tab under Portal Admin, by entering a new password and clicking Reset Admin Password.
Note: An admin can create accounts for colleagues under Management so they can sign online too. Each user signs with the signing PIN they were given.
Sign myself — hand-drawn signatures with Visual Signing
- Open the Sign myself menu and follow the setup instructions numbered 1 to 5 on that page.
- In Visual Signing, add the PDF you want to sign.
- Open the Draw tab and draw your signature in the white area below it.
- Click Place signature on PDF to preview where the signature will sit.
- Click Sign & Download to sign the file and save it.
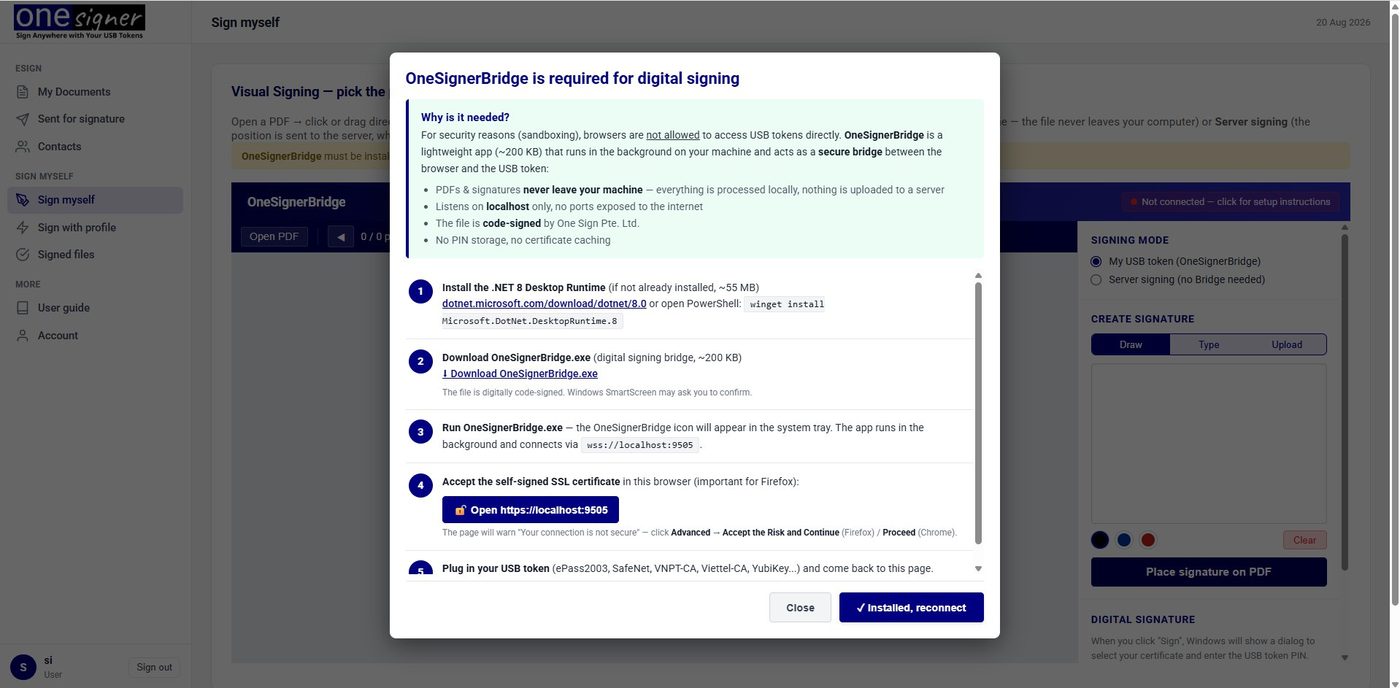
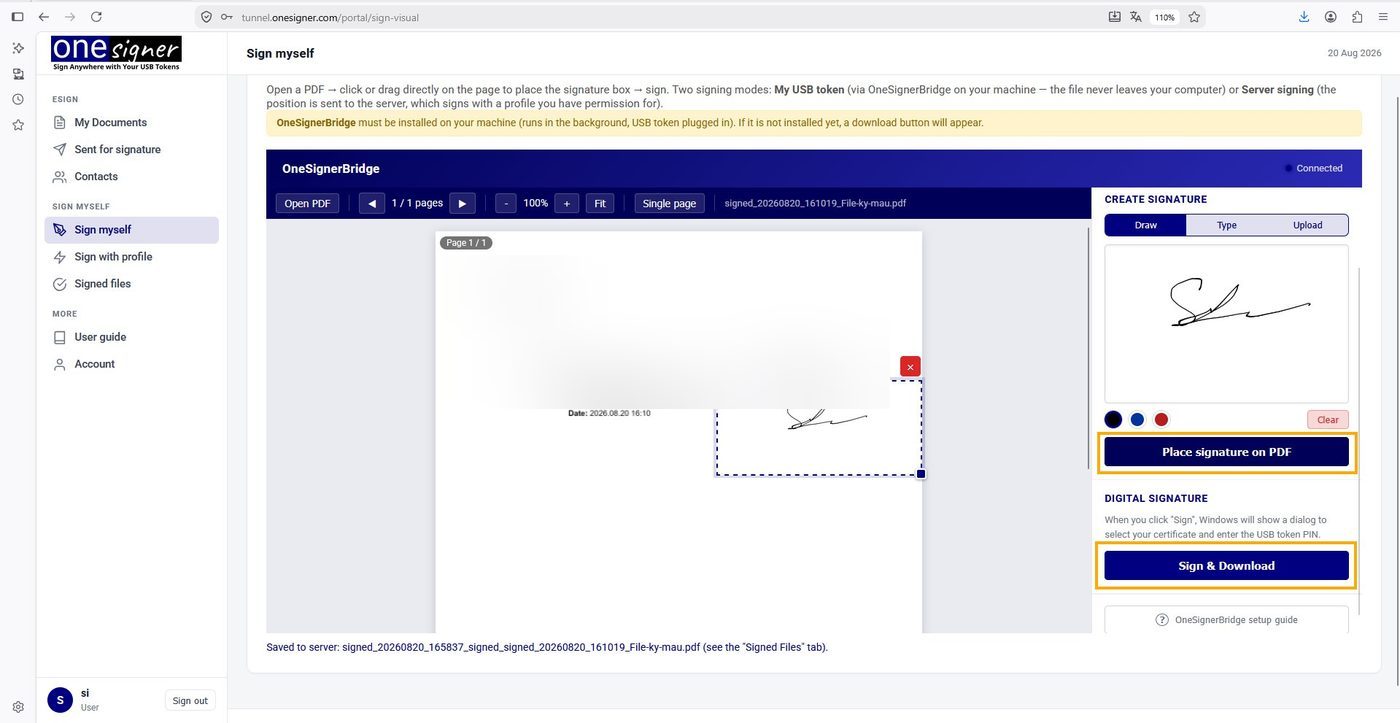
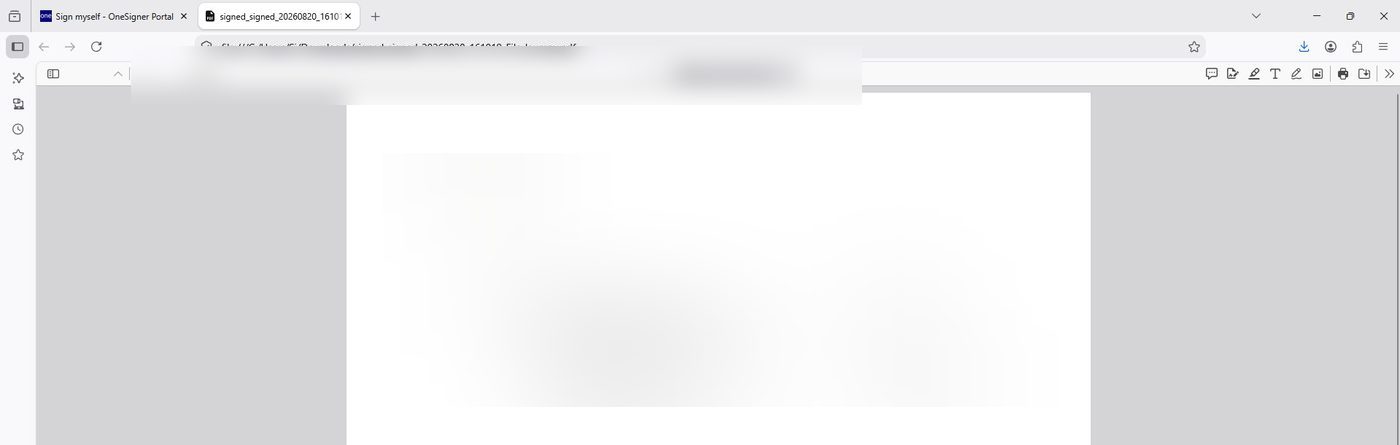
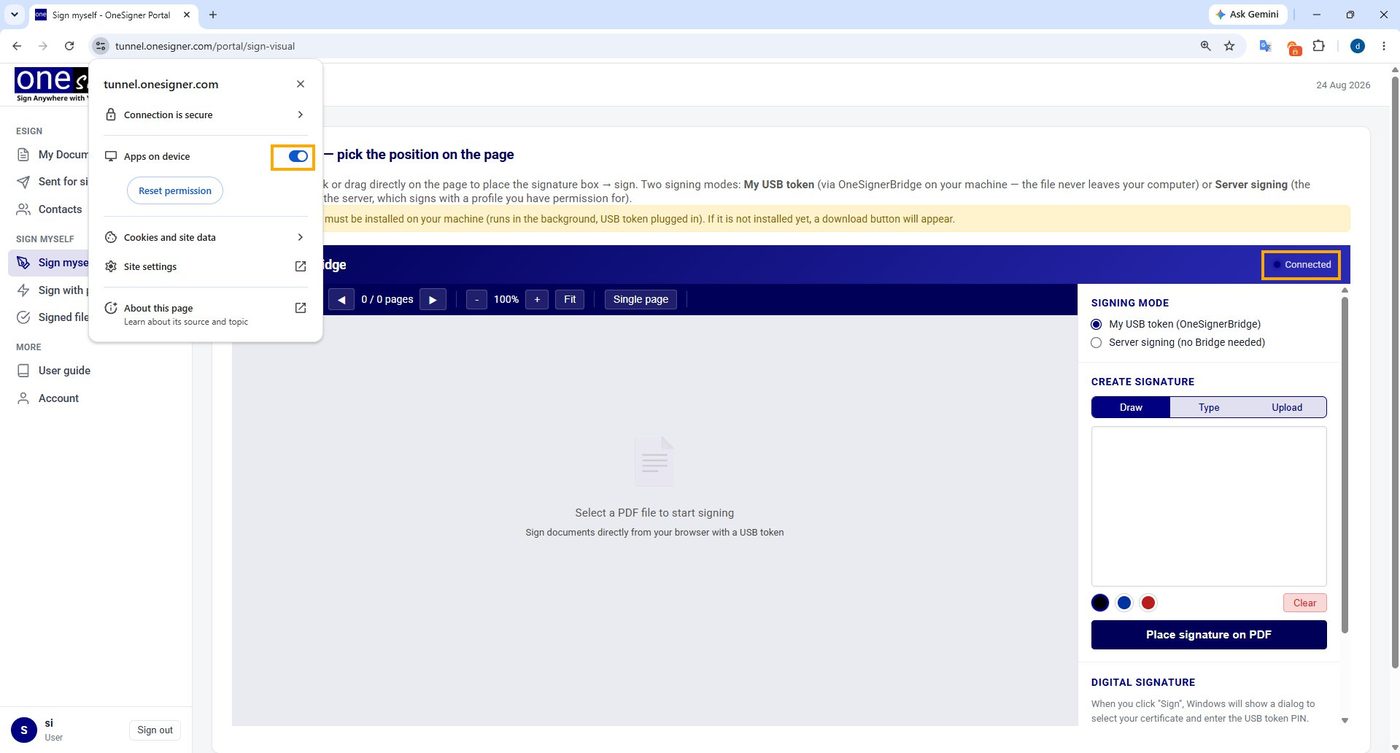
Note: The screenshots above use Firefox. If you sign by hand in Chrome, you must enable Apps on device for the site.
12 Sign from the command line
Code-sign directly on the OneSigner machine, or remotely from a build machine using a generated AKV package.
Option 1 — sign directly with the CLI
- Open Command Prompt as administrator.
- Run the command in this form:
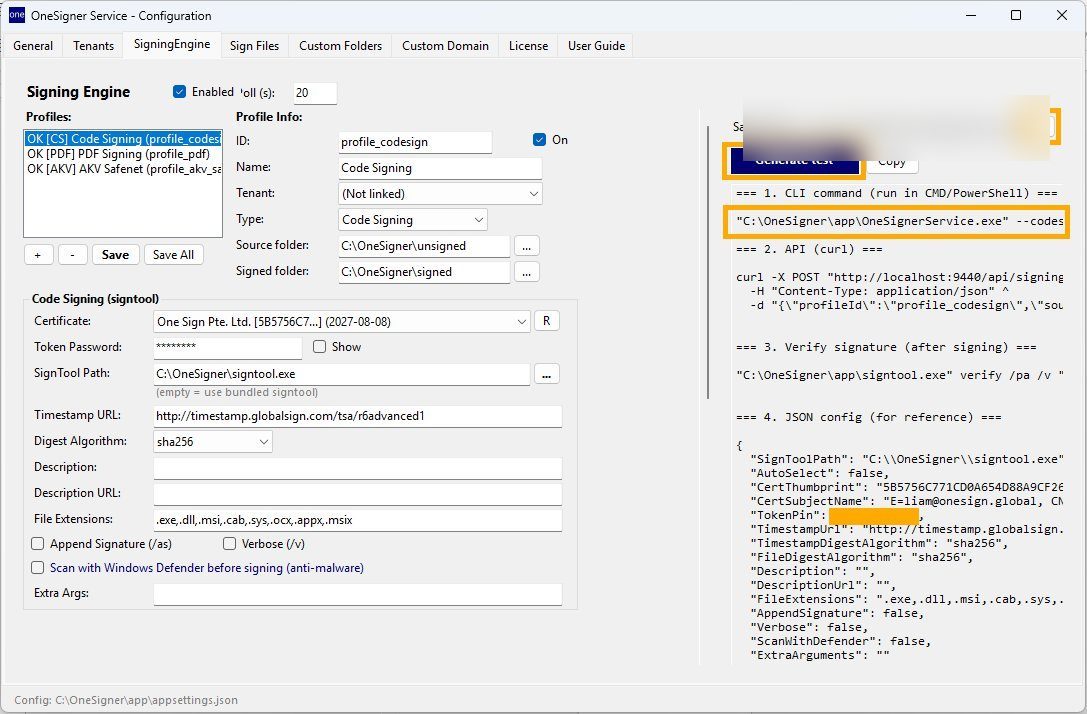
"C:\OneSigner\app\OneSignerService.exe" --codesign /sha1 <Thumbprint> /pin <Token-Password> /fd sha256 /tr <Timestamp URL> /td sha256 "path to the file you want to sign"- Press Enter and wait for the result.
Note: OneSigner can build this command for you — open the app and copy the suggested CLI command, which already contains your certificate thumbprint and timestamp URL.

Option 2 — sign remotely with an AKV package
- On the OneSigner machine, go to the SigningEngine tab, type a name under Partner codes and click + Create.
- Click the entry you just created, then click Build .zip to download the package.
- Extract the package on the machine that will sign, and copy the file you want to sign into the extracted folder.
- Open Command Prompt as administrator,
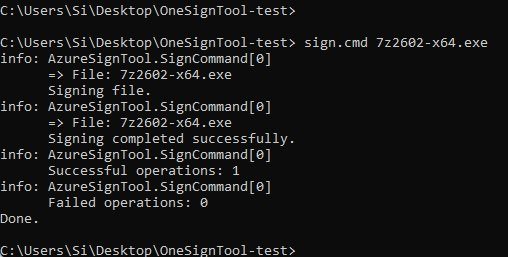
cdinto the extracted folder and runsign.cmdwith the path of the file to sign. For example:
cd C:\Users\Si\Desktop\OneSignTool-test
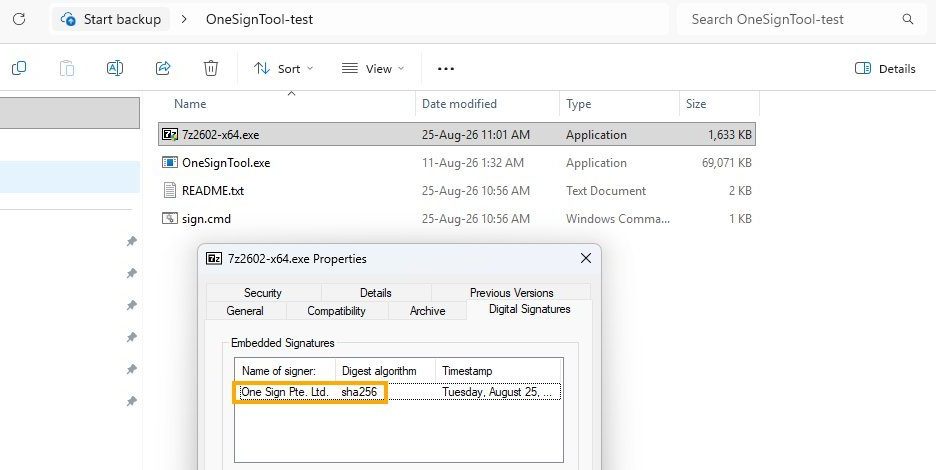
sign.cmd 7z2602-x64.exe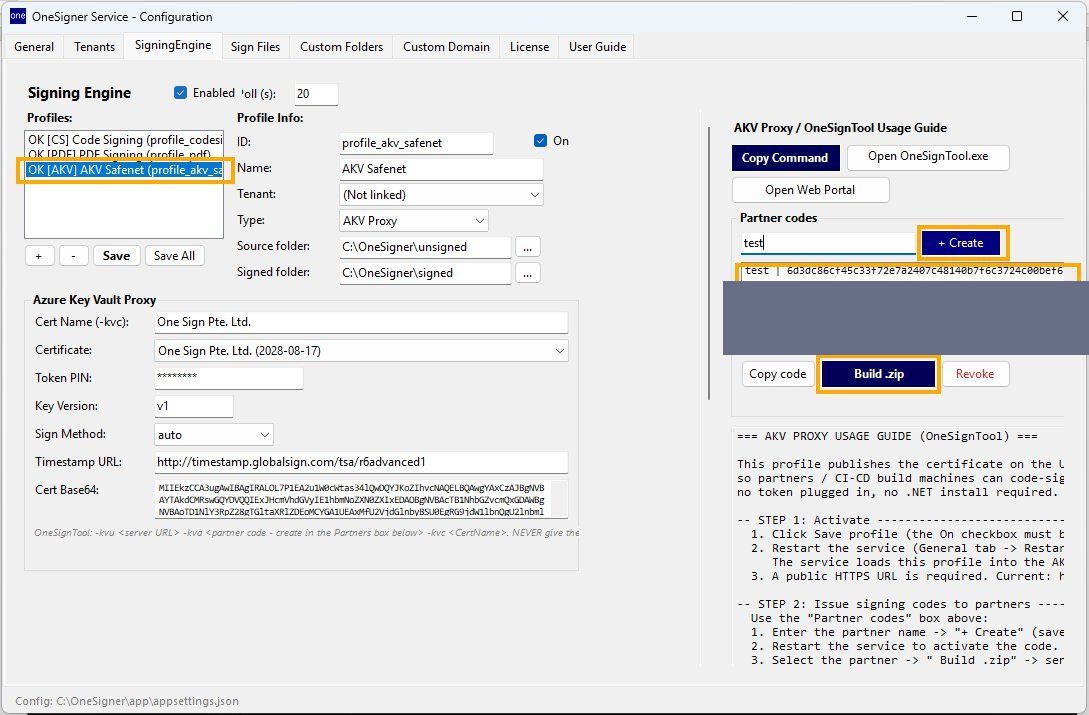
13 Give your team accounts and anchor the signature to text
Place the signature below a chosen piece of text and let colleagues sign with their own portal accounts.
- In the OneSigner app, open the signing profile and set the signature to be placed below the text you enter.
- Click Save, then go to the General tab and click Restart to apply the change.
- In the portal, create accounts for your colleagues under Management and give each of them a signing PIN.
- Ask them to sign in to the portal and sign a document from Sign Documents. The signature lands under the text you anchored it to.
Note: What a token can sign depends on the certificate it holds — a YubiKey provisioned for document signing only will sign PDFs, not code. See the Knowledge Base if you are unsure which certificate you have.
All done — what next?
Your tokens now sign for everyone: browse the Knowledge Base for the REST API reference, multi-tenant setup and troubleshooting, or buy a license when your trial ends. Stuck on a step? Talk to us — we answer setup questions directly.