Code Signing Setup
OneSigner automates Windows Authenticode code signing with the certificate on your USB hardware token — no PIN dialogs interrupting builds, no cloud signing fees.
Supported File Types
.exe, .dll, .msi, .cab, .sys, .ocx, .appx, .msix — configurable per profile; catalog files and PowerShell scripts are supported via the CLI.
What You Need
- A code signing certificate (standard or EV) on a USB token — SafeNet eToken, YubiKey, or any CSP/minidriver token. All major CAs supported (DigiCert, Sectigo, GlobalSign, SSL.com, Entrust…).
- The token's driver installed, certificate visible in
certmgr.msc. - Tip: certificates bought through OneSigner Certificates come with a free thumbprint-locked OneSigner license.
Create a Code Signing Profile
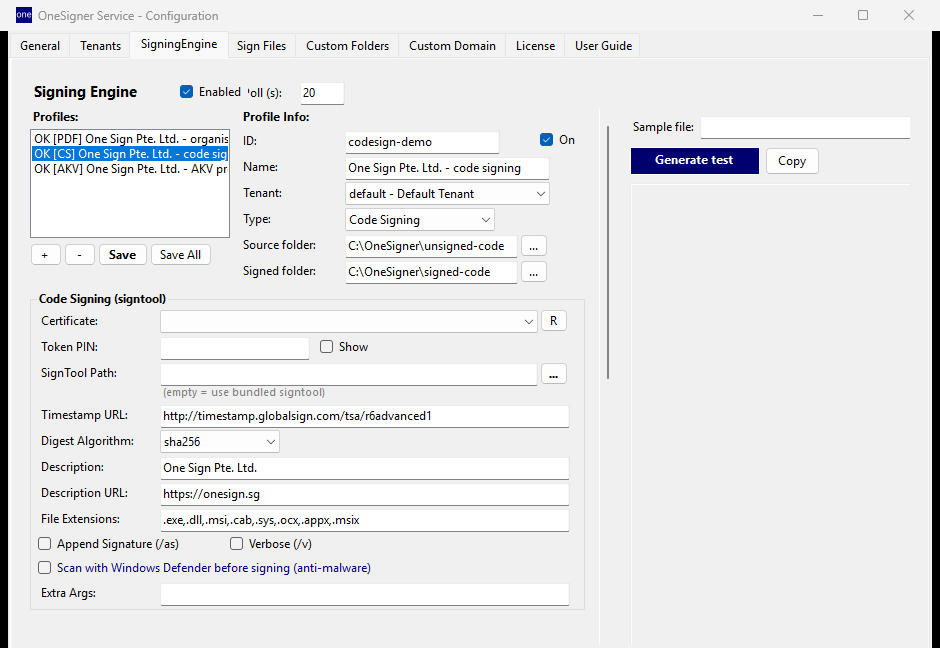
- Open OneSigner Configuration → SigningEngine tab → add a profile with type Code Signing.
- Configure:
- Certificate — pick your code-signing cert from the store (selects by SHA1 thumbprint internally).
- Token PIN — stored DPAPI-encrypted; enables fully unattended signing.
- Timestamp URL — e.g.
http://timestamp.digicert.com,http://ts.ssl.com,http://timestamp.globalsign.com/tsa/r6advanced1. Always timestamp: the signature stays valid after the certificate expires. - Digest algorithm —
sha256(or sha384 for ECC certs). - Description / URL — shown in the file's signature details (
/d,/du). - File extensions — which types this profile signs.
- Source / Signed folder — for folder-watch signing.
- Options: Append signature (
/as, dual-sign) and Scan with Windows Defender before signing — an anti-malware gate so you never sign an infected binary.
- Click Save, then use Generate test to sign a test file and verify end-to-end.
Ways to Sign
- Folder watch: drop binaries into the source folder; signed output appears in the destination folder.
- API:
POST /api/codesignorPOST /api/upload?download=true— upload, sign, get the signed file back in one call. See CI/CD integration. - CLI (signtool-style):
OneSignerService.exe --codesign /sha1 THUMBPRINT /pin PIN /fd sha256 ^ /tr http://ts.ssl.com /td sha256 /d "My App" /du https://example.com ^ /v /o signed.exe input.exe - Remote via OneSignTool / AzureSignTool: the token stays on the server; build machines sign over HTTPS. See Azure Key Vault Proxy and the OneSignTool CLI guide.
How OneSigner Signs (Under the Hood)
OneSigner picks the best available method automatically: in-process Win32 signing (SignerSignEx2), ScSignTool with automated PIN entry, or signtool.exe — plus direct PIV signing for YubiKeys (including ECDSA P-256/P-384 certificates, no CSP required). PIN handling is automated in every path, so nothing blocks an unattended build.
Verify
- Right-click the signed file → Properties → Digital Signatures — your certificate and the timestamp should be listed.
- Or:
signtool verify /pa /v myapp.exe.
Related: Choosing a certificate before you set this up? The EV code signing guide covers what the CA verifies, how the key must be stored, and what changes for kernel-mode drivers.